Twin Tested

We test the latest beauty, fashion & lifestyle trends so you don't have to!

  • Home
  • About Us
  • Contact Us
  • Twin Tested
    • Do’s and Don’ts for Family Photos
  • Food
    • Recipe for the BEST Banana Pudding of all time!
  • Beauty
    • Makeup must-haves from our group course
  • Life
    • Hazel & Lila are ONE!
  • Privacy Policy
Twin Tested > 2022

Archives for 2022

Our DIY Bathroom Remodel

How to do a bathroom remodel on a budget

*There are affiliate links in this article. Thank you for your support, we hope they are helpful!

We mapped out every product and purchase for our bathroom remodel before we did any demo. In short, the vanity, hardware, mirror, bathtub, tile, wallpaper, and shelves were all chosen before a hammer was taken to any walls. Bathroom remodels are notorious for being expensive so we knew we wanted to do the tile ourselves. By “we”, I mean Parker haha.

How did we save money?

We saved money in a few specific areas like the tile and bathtub because we relied on our skills and got professional estimates and opinions. When a contractor did an estimate for us and encouraged us to do the tile work ourselves if we wanted to save money we took it to heart! If you have been here for a while then you know that Parker has already tiled our fireplace and kitchen backsplash.

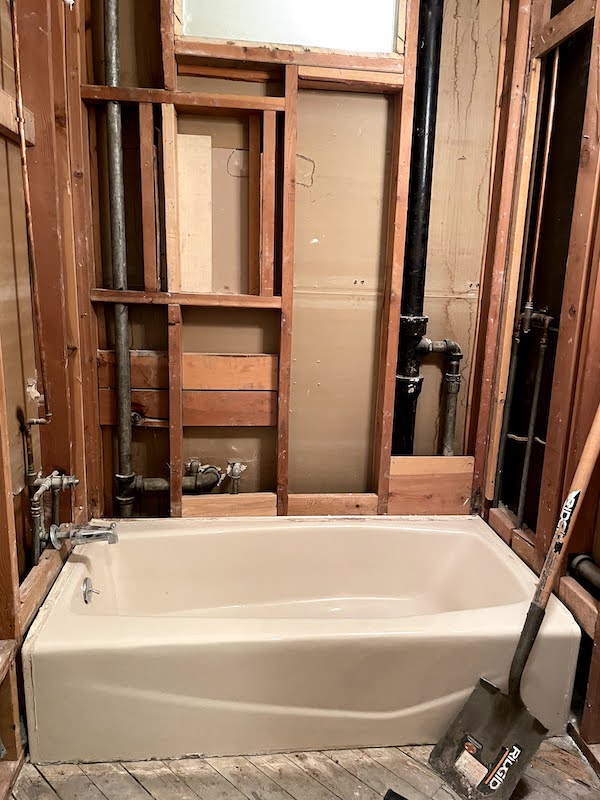
What to watch out for when it comes to bathtubs

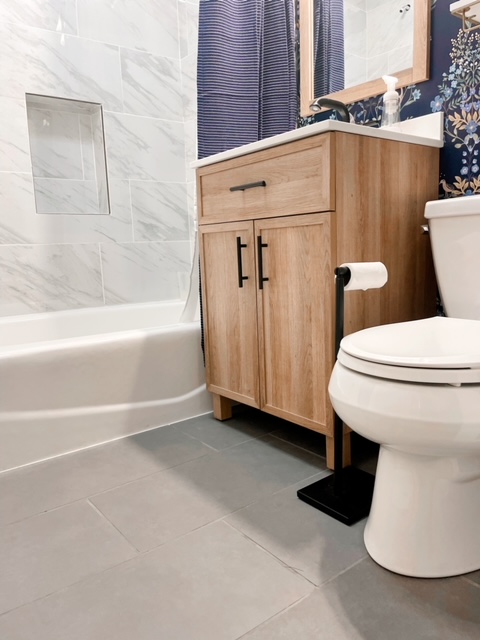
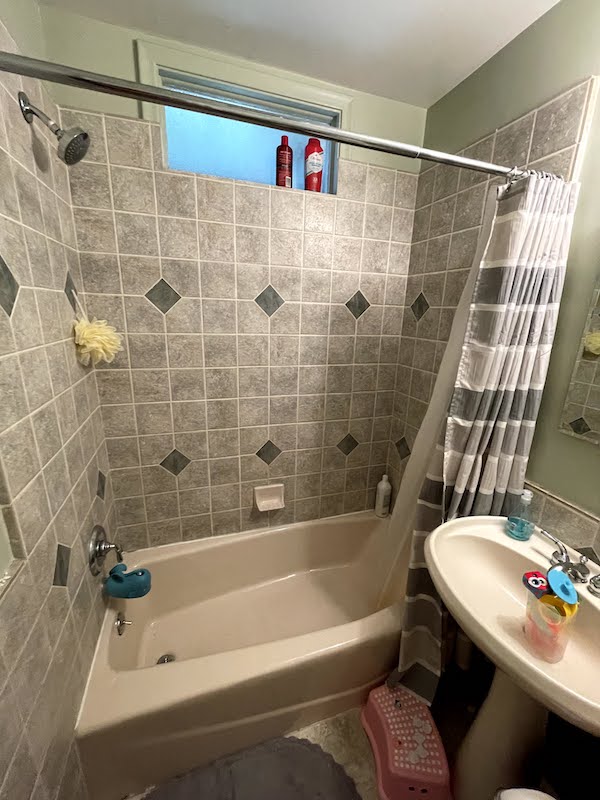
Going into the remodel we planned to totally replace our old tub. However, that changed once we had a contractor come look at the bathroom. He encouraged us to keep the tub and instead get it refinished in white. I had no idea that removing a cast iron tub can be super expensive because they are so heavy and hard to deal with. By getting our bathtub refinished we spent $600. In comparison, purchasing a brand-new bathtub and getting it installed is about $3,000.

What we splurged on for the bathroom remodel

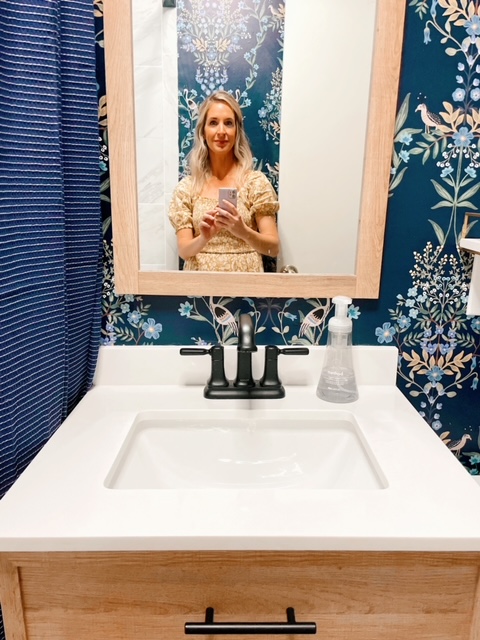
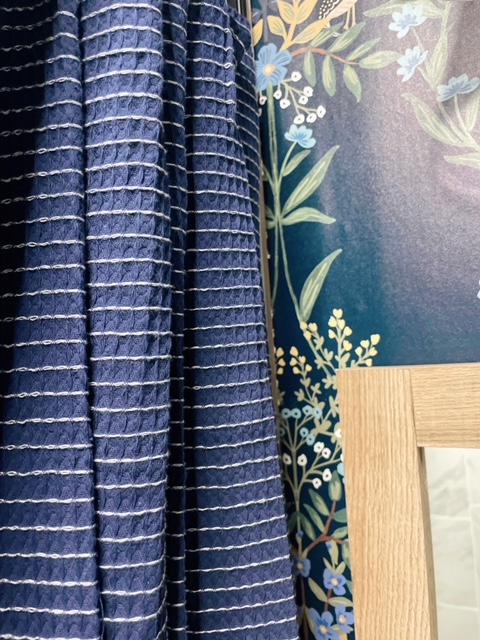
I love Rifle Paper Co. wallpaper and decided on a navy and white color palette for the bathroom remodel. We decided to buy the peel-and-stick product and it turned out beautifully. Although, I wouldn’t say it is best for your marriage to install wallpaper together in a small space until 1 AM. 😅

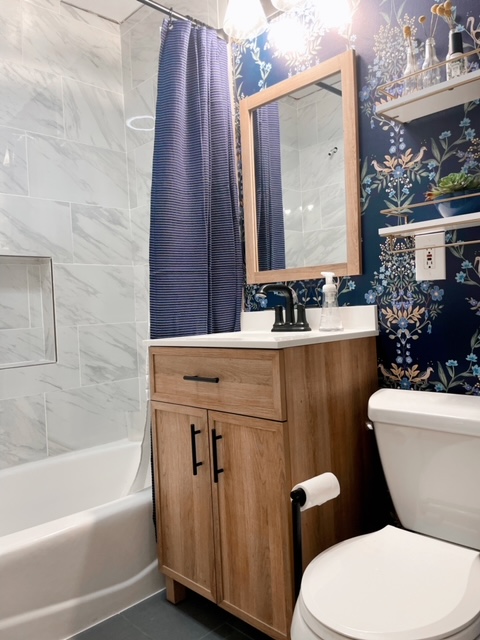
We went with marble tile for the shower. This is on the pricier side but white marble is timeless and really completed the look we were going for. Clean, simple, and classic.

Where to look for bathroom products

I was able to find our vanity (similar) at Lowe’s and the toilet at Home Depot (similar), great options if you have a small space. Then we picked out our tile for the shower and floor from Floor & Decor. Lastly, the wallpaper was purchased through Anthropologie.

How long does it take?

Overall, the entire project from start to finish took about 10 months! It is not a small job to take a bathroom down to the studs and then rebuild it piece by piece. Therefore, my number one piece of advice is to be patient. It always takes longer than expected. Be okay with that and have an extra bathroom that you can use in the meantime!

What I would do differently next time

All things considered, I honestly love how it turned out! The navy wallpaper really packs a punch against the white marble and the gray tile on the floor has held up really nicely. Nonetheless, if we do it again I would shift my expectations and prepare for delays. They always happen and it is not the end of the world. My husband was amazing and spent many late nights and weekends working in the bathroom. I guess it’s time to think about our next project!

November 5, 2022 2 Comments

How to plan a safari trip to Africa

Once-in-a-lifetime

For most of us, Africa is a once-in-a-lifetime opportunity. The flights are long, and the safaris are hard to get to, but the payoff is unmatched! While preparing for our trip I had a lot of questions on my mind. What should I pack? What should I expect once I get there? And what is Africa really like? In this post I hope to answer all of those questions and more!

Choosing Your Destination City

We flew into Johannesburg, we knew we were picking up my husband’s mom who had been serving as a missionary for the Church of Jesus Christ of Latter-Day Saints. We were incredibly lucky to be joining someone who had been living in Africa for a year and knew her way around and the nuisances of the city – and how to drive on the opposite side of the road! She put together our itinerary and it was nonstop safaris and adventure. I wish you all could have my mother-in-law in your life, she is the absolute best! When you plan your destination city it will determine the rest of your visit. For example, Johannesburg is a 15-hour drive from Cape Town. Africa is huge and you need to factor in the travel times to the places that you will be going. We ended up spending our time in Johannesburg, Pretoria, Pilanesburg, and Kruger National Park.

What To Pack

Remember, you are traveling to the Southern hemisphere. So while it is summertime in the United States, it is the middle of winter in Africa. This turned out to be perfect timing for us because it meant no bugs and highs around 65 degrees fahrenheit! Another bonus is the animals are active throughout the day because they don’t get too hot from the heat. Knowing that it was their winter helped us prepare by packing a ton of layers. Here is what I would put on your packing list for Africa:

  • Nice Binoculars (we borrowed ours): These are crucial on safari and make it so fun to spot animals from a distance. Even when animals are nearby it is amazing to see their detail up close through the binoculars. Pro tip: You can take pictures and video through binoculars – I dare you to try it! We have some amazing animal photographs because of it.
  • Layers: I wore a hat every single day we were there as well as two jackets, a scarf, and long sleeve shirts.
  • Wool Socks: Just trust me on this, your feet will be so much happier when they are nice and warm. I was so glad that I brought mine.

Where to Stay

My mother-in-law is an incredible traveler and trip planner and I am so grateful for the time she put into every detail of the trip. If you are headed to Africa I would 100% recommend going to Pilanesberg National Park. That is where we started our trip and it is what dreams are made of. We stayed at the Ivory Tree Lodge which is an upscale paradise with some of the most delicious food I have ever had. One of my favorite things they do there is an afternoon tea filled with delicious snacks and the creamiest hot cocoa. My husband and I stayed in our own thatched roof hut complete with luxe robes, a gigantic marble bathtub and gorgeous outdoor shower – we felt like we were on our honeymoon! Think of the huts similar to the ones over the water in Bora Bora but instead in the middle of a national park with elephants, giraffes, and lions mere feet from your door! When you stay at Ivory Tree Lodge the game drives are a complimentary part of your stay and it truly feels like you are driving into Jurassic Park when you descend down the winding driveway and through the electric gate each morning. We saw the “The Big 5” within the first two hours of arriving at the park! The Big 5 is the goal when you are on game drives and is comprised of: elephant, lion, leopard, rhino, and cape buffalo. We saw lions mating (in middle of the road), a mama and baby rhino at a watering hole, a pack of lion sub-adults (what they call teenagers), and so many more incredibly beautiful wild moments. Our guide told us that we were extremely lucky and that some people don’t see all of the big 5 during their entire visits to Africa. Pilanesberg is super beautiful, when you think of African grasslands this is it. It is also easy to access from Johannesburg. I highly recommend it!

Our safari through Kruger National Park

We ended our trip with Kruger National Park, which was a 6 hour drive from Pilanesberg. This is the national park that I had heard of before visiting. It is massive and touches borders multiple countries in Africa. We only had one day in Kruger so we chose to spend it with a guide. That is my other biggest piece of advice: pay for a guide! The OSV’s or (Offroad Safari Vehicles) set you up quite high off the ground so you have a much better view than if you were in your own car. The guides know where the animals are, it is their passion, they will take you to the watering holes and other spots to get the best animal sightings. I talked to a few people who drove their own cars and they did not see half as many animals. Go with a guide, they are so knowledgable and it is so interesting to hear them tell you about the vegetation and how the animals all interact with each other.

Goodbye Africa

I am so grateful for the opportunity I had to visit Africa. A truly magical place that is unlike anything I have ever experienced. If you are wanting to save up for a big trip, start planning your African safari! It was incredible and I am not sure how any other trip in the future will compare.

July 10, 2022 Leave a Comment

Strawberry Brownie Homemade Ice cream

We are back with another crowd-pleasing homemade ice cream favorite! Drumroll please, introducing… strawberry brownie homemade ice cream! Last summer was all about Raspberry Oreo Icecream, thanks to everyone that has tried it and shared the recipe. You have made it one of our most popular posts and we understand why!

The best homemade ice cream maker

If you are new to homemade ice cream may we suggest the Cuisinart Icecream Maker? It is about $100 on Amazon and can make the most delicious ice cream in less than an hour. We have tried a few different brands and this one is our favorite for a few reasons:

  • FAST: It’s super speedy! We grew up with an old-fashioned ice cream maker that took 4-5 hours to make ice cream. It was a time-intensive labor of love. This Cuisinart ice cream maker simplifies the process.
  • NO SALT: You don’t have to buy rock salt (who has that on hand?!)
  • NO ICE: You don’t have to fill it with ice (it can be tedious to continually refill the ice on a hot summer day)
  • SIZE: You get two quarts of ice cream, a lot of the other at-home ice cream machines make one quart, we are usually feeding a crowd for a party or event so the bigger option is better for us. And the best part of making some is saving a bite or two in the freezer for the next day!
  • EASY: It takes minutes to clean and put back in the cupboard

First-timers

For your first batch, may we suggest our chocolate marshmallow recipe? It is super simple to follow but the results will knock your socks off! The super creamy texture of the chocolate is something I crave often. The chocolate marshmallow ice cream does not have any mix-ins so it is a good one to start with so you can see how the texture turns out.

How we decided on strawberry brownie

We settled on the new strawberry brownie recipe after a deep discussion about Ghiradelli brownie mixes from Costco versus the grocery store. (There is a difference, although it is slight) The fudgy texture of the Ghiradelli mix is perfect for this recipe. We love that the brownie mix has chocolate chips sprinkled throughout each brownie.

The big mistake we made

When my new ice cream maker was delivered I was so excited to use it! I put it in the freezer for a few hours and forgot about reading the instructions. When I tried making ice cream that night — it never thickened up! Lesson learned. You have to keep the bowl in the freezer for at least 48 hours before using it. Now we just keep ours in the freezer all the time so that we can have ice cream ready at a moment’s notice.

A few notes before starting

Raspberry was an obvious choice when we were using oreo so we wanted to try something different and went with strawberry. A few notes before you make this recipe:

  • Make sure to puree the strawberries, we diced and then mashed ours and the chunks still felt a little too big once they were frozen.
  • Crumble the ENTIRE brownie pan into the ice cream, we only did half of the pan and regret it. Obviously, the brownie chunks are the best part!
  • It’s all about quality ingredients, we like to get our heavy cream at Costco, with organic berries and Ghiradelli chocolate.
  • Make sure you put your freezer bowl for your ice cream maker in your freezer for AT LEAST 24 hours before making ice cream. This is the only part of the recipe that requires any planning!

Here is the recipe, it should take you less than an hour from start to finish with about 5 minutes of prep!

Yield: 2 quarts

Stawberry Brownie Icecream

strawberry brownie icecream

This icecream recipe has the perfect combo of creamy vanilla, fudgy brownie, and fresh strawberry all in one bite!

Prep Time 5 minutes
Cook Time 40 minutes
Total Time 45 minutes

Ingredients

  • 2 eggs
  • 1 C white sugar
  • 4 teaspoons vanilla
  • 1/2 teaspoon salt
  • 2 C heavy cream
  • 1 C 1% milk
  • 2 C strawberries, pureed
  • 1 pan of Ghiradelli brownies, crumbled

Instructions

  1. Add sugar to beaten eggs and whip until stiff peaks. This takes 5-10 minutes.
  2. Add the remaining ingredients.
  3. Remove from mixer and pour into ice cream maker.
  4. Turn on and mix until it starts to thicken (mine takes 20-25 minutes)
  5. When the ice cream has started to thicken, add the crumbled brownie.
  6. Add in pureed strawberries
  7. Serve immediately and enjoy!

Notes

Do not overbake the brownies, you want to have a fudgy texture!

© admin
Cuisine: dessert / Category: Food

May 15, 2022 Leave a Comment

Silk’n Infinity Laser Hair Removal Honest Review

I am finally giving an update to the Silk’n Infinity Laser Hair Removal product I started using about 9 months ago. It is not recommended for use while pregnant or nursing, so I eagerly waited until I could use it. I have been using it regularly, about every 2-3 weeks. Let’s just get one thing out of the way first – I am a hairy beast. Like, this is the perfect product for me because I have pale skin and thick, dark hair. So, if you are blonde and tan, this may not work. Or, if you have olive or darker skin tones, it may not work. This system of laser technology needs pale skin and dark hair to work effectively.

The Silk’n Infinity‘s eHPLâ„¢ technology uses pulses of light to get rid of hair. You can buy one here.

It is EASY

It is so easy to use. I was worried about the learning curve and I shouldn’t have been. It comes with a great little booklet that explains how to use the product. It requires very little set-up, you really just plug it in and turn it on. 

It saves TIME

As someone who has spent thousands of dollars and way too many hours in medical spas getting professional laser hair removal treatments done, this is such a welcome tool! I used to spend 30 minutes driving to a very popular spa and then would be there for about an hour getting my laser treatments. Not only that, but they would apply ultrasound gel everywhere they were going to laser, so I would leave feeling like a goopy mess. As if it isn’t humiliating enough having someone laser your bikini area, let them squirt ice cold gel on it right before. Miserable.

I can do my entire body – armpits, bikini area and legs in less than 10 minutes with the Silk’n Infinity. .

It saves MONEY

I know $400 may seem like a steep price, but if you compare it to the cost of getting professional laser hair removal done, it is a steal. Typical laser treatments cost about $400-$500 per area. That means if you want to get your underarms, bikini and legs, you would be paying well over $1,500. Not only that, but unfortunately it doesn’t last forever. Pregnancy taught me that. All of the hair grew back – and then some. So you do need to do touch-ups and treatments repeatedly through the years. I think it has been such a great investment. You can also share the tool with a sister or friend and pay half the cost. I have let many friends and family members try mine out before they purchase their own. Of course I thoroughly sanitize it after every use.

You look incredibly SILLY using it

My husband now knows if I’m walking around the house with sunglasses on, I’m headed to do some laser hair removal. Ha. But seriously, don’t forget to wear sunglasses! You never want to stare directly at the laser and the sunglasses will protect your eyes. You will for sure feel like an idiot and that’s just part of the fun.

It actually WORKS

I am thrilled to report that it actually works. I have been faithfully using it and have noticed the biggest difference in my underarms and bikini area. My legs are more stubborn (and also tanner) and have not been working as well.

UNDERARMS

I was back to the point of having a permanent shadow – even right after shaving. Now, I can go 3 days without shaving and I never have any visible shadow. The hair in my underarms has thinned dramatically. I think if this product only worked on underarms, I would still buy it. I’ve been so pleased with the progress.

BIKINI AREA

I have held my breath through many bikini and brazilian waxes and I’m happy to report this is a lot less painful. Unlike a wax, it has not gotten rid of all the hair, but it has thinned the hair dramatically.

LEGS

I regularly use self-tanner on my legs, so they are darker than the other areas. I have not noticed a huge improvement, but maybe a slight thinning. I think I may need more time to see better results on my legs.I also think my skin tone on my legs does play a role in it not working quite as effectively.

You can SHAVE

One of the best parts about the product is the fact that you are supposed to use it right after you shave and shower. This makes it such a simple step to add to my routine. You don’t have to apply any gel (thank heavens!) and can easily finish your entire body in 10 minutes. There is nothing worse than wearing long pants in the middle of summer because you haven’t shaved for 3 weeks while waiting to get your legs waxed. Shave and be free! It’s so great.

It doesn’t HURT

It is not painful. If you are interested in buying a laser hair removal tool, chances are you’ve gotten a wax before and this is way less painful than that. If you’ve done professional laser hair removal, you know it can sometimes feel like the snap of a rubber band. Maybe a tiny sting, but nothing more. I think it is less painful than any of the professional treatments I have had. There are also 5 different intensities you can choose from, so you can start slow and ease into it.
I think I’ve covered everything, but if you have questions, please feel free to ask!

Related Posts Plugin for WordPress, Blogger...

May 11, 2022 Leave a Comment

Hi! We are identical twins, Brooke & Brittany. We test the latest trends in fashion, beauty, travel and fitness so that you don't have to.

Popular Posts

  • 5 Hacks for Staying on Budget While Building a New Home
  • How to Pick a Home Builder
  • Guide to an Unforgettable Anniversary in Italy

Archives

  • October 2025
  • September 2025
  • April 2025
  • October 2024
  • June 2024
  • January 2024
  • November 2023
  • July 2023
  • June 2023
  • November 2022
  • July 2022
  • May 2022
  • November 2021
  • October 2021
  • August 2021
  • April 2021
  • March 2021
  • January 2021
  • December 2020
  • November 2020
  • October 2020
  • September 2020
  • August 2020
  • July 2020
  • May 2020
  • April 2020
  • March 2020
  • February 2020
  • January 2020
  • December 2019
  • November 2019
  • October 2019
  • September 2019
  • August 2019
  • July 2019
  • June 2019
  • May 2019
  • April 2019
  • March 2019
  • February 2019
  • January 2019
  • December 2018
  • November 2018
  • September 2018
  • July 2018
  • June 2018
  • April 2018
  • March 2018
  • December 2017
  • October 2017
  • September 2017
  • August 2017
  • July 2017
  • June 2017
  • April 2017
  • March 2017
  • January 2017
  • December 2016
  • November 2016
  • October 2016
  • September 2016
  • August 2016
  • July 2016
  • June 2016
  • May 2016
  • March 2016
  • February 2016
  • January 2016
  • November 2015
  • October 2015
  • September 2015
  • August 2015
  • July 2015
  • June 2015
  • May 2015
  • April 2015
  • March 2015
  • February 2015
  • January 2015
  • November 2014
  • October 2014
  • September 2014
  • August 2014
  • July 2014
  • June 2014
  • May 2014
  • March 2014
  • February 2014
  • January 2014
  • December 2013
  • October 2013
  • August 2013
  • June 2013
  • May 2013
  • March 2013
  • February 2013
  • January 2013
  • December 2012
  • October 2012
  • August 2012
  • July 2012
  • June 2012
  • May 2012
  • February 2012
  • December 2011
  • October 2011
  • August 2011
March 2026
M T W T F S S
 1
2345678
9101112131415
16171819202122
23242526272829
3031  
« Oct    

Copyright © 2026 · Twin Tested A Blog By, Brooke & Brittany