Twin Tested

We test the latest beauty, fashion & lifestyle trends so you don't have to!

  • Home
  • About Us
  • Contact Us
  • Twin Tested
    • Do’s and Don’ts for Family Photos
  • Food
    • Recipe for the BEST Banana Pudding of all time!
  • Beauty
    • Makeup must-haves from our group course
  • Life
    • Hazel & Lila are ONE!
  • Privacy Policy
Twin Tested

Transform Your Kitchen: A Step-by-Step Guide to Painting Cabinets for a Quick Home Makeover

DIY or Hire it out?

Do you want to update your kitchen with some freshly painted cabinets? We have wanted to paint our cabinets for a while but it seemed like a massive undertaking. This year we did some research and found a friend that has a cabinet painting business. We decided we would leave the cabinet fronts to the professionals and we would DIY the cabinet boxes ourselves. Now in hindsight, I am so happy we did this! The cabinet fronts that we had painted professionally look like brand-new cabinets. The cabinet boxes that we painted ourselves do not look quite as good… but you only see the minor mess-ups if you open the cupboard.

Before buying painting supplies this is the first thing you should do

Before going to Home Depot and spending hundreds of dollars on supplies (that will come soon enough), you should sketch a map of your kitchen. My husband thought this idea was kind of silly so we were a little lax. Looking back we wish we would have been more detail-oriented when it came to labeling the cabinets, hinges, and drawers, before taking them apart. If you are putting them back on yourself then having things labeled will really speed up the process.

You can take it one step at a time

You don’t have to do it all at the same time when it comes to updating your kitchen. Our first project was to replace the tile in the kitchen with LVP wood flooring. Up next, we tackled the backsplash by replacing the strange Southwestern pattern with a simple white subway tile. Then we tackled the appliances and updated those to a stainless steel finish when we found products we liked. Once all of those were done it was time to decide on a paint color for the cabinets.

How to choose a paint color for your kitchen cabinets

I was on the fence about choosing a paint color for the kitchen cabinets. We have pale grey walls and a white subway tile backsplash. I knew we couldn’t do grey since it would probably end up clashing with the walls. I talked to a friend who had her cabinets professionally redone and went to see them in person. She had picked Benjamin Moore Simply White and I loved how light and bright they looked. We decided to go with the same color and I am so happy we did. Our painter said it is by far the most common paint color he uses, he said 80% of his customers request it, and this made me confident that we made the right choice. Especially if we sell our house one day, it definitely appeals to the masses and has a more timeless feel.

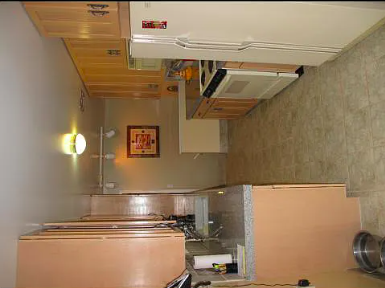
Prepare for your home to be a construction site for a few weeks

We definitely sped up the process by having the cabinet fronts painted professionally. We dropped them off on a Wednesday and they were ready for pick up the next week. Our DIY painting of the cabinet boxes took a bit longer. We had a good bit of sanding to do and that created quite a mess in our house. Then I wasn’t quite prepared for how strong the paint fumes were while we were painting the boxes and then when they were drying. I am so glad we did this project in the spring. I cannot recommend this enough. You do not want to do this project in the dead of winter when you cannot crack open all the windows. Having fresh air flow in from outside made it much more livable.

How to choose hardware for your kitchen cabinets

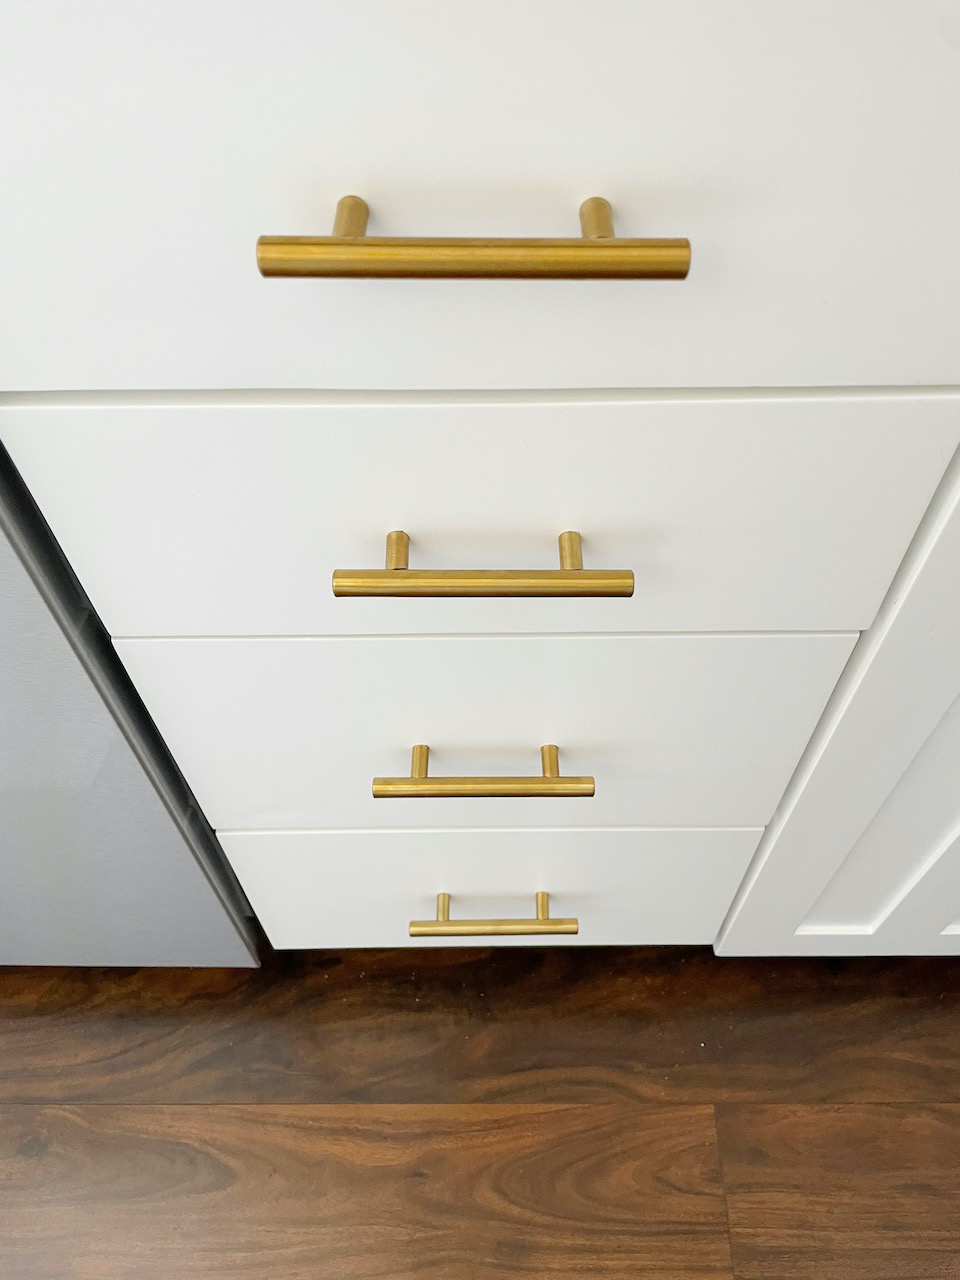
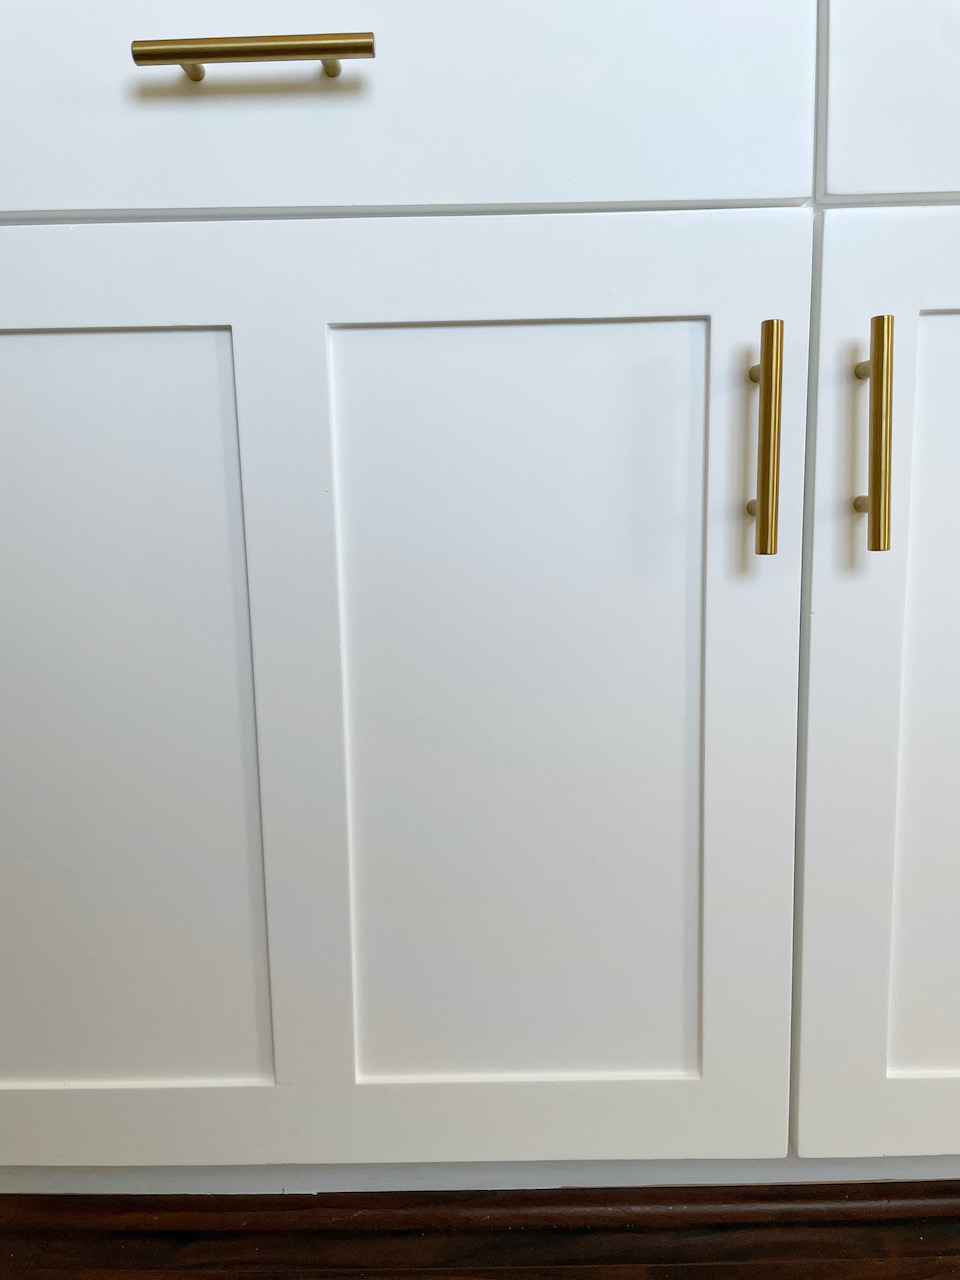
I had a tough time choosing hardware for the cabinets. I love gold but had also seen silver and black look really nice against white painted cabinets. I ordered a few options from Amazon and ultimately went with these gold handles (be sure to apply the 10% off coupon once you are in the Amazon app!). I love how they look now and am glad we went with gold. I had ordered drawer pulls to go along with them but they ended up being a much lighter shade of gold so we decided to keep it uniform with the handles throughout. When ordering handles and pulls beware that different styles can have different sheens and tones.

Last, but most important, tip

Find a husband or partner that enjoys DIY projects! Parker truly finds joy in doing things himself. He is also very good at it. He installed all of the new cabinet fronts in one night while I was at a dinner with girlfriends! I know, what a guy. I realize I am lucky. Before you start the project you have to realize that you have to put hours into it if you want it to turn out looking good.

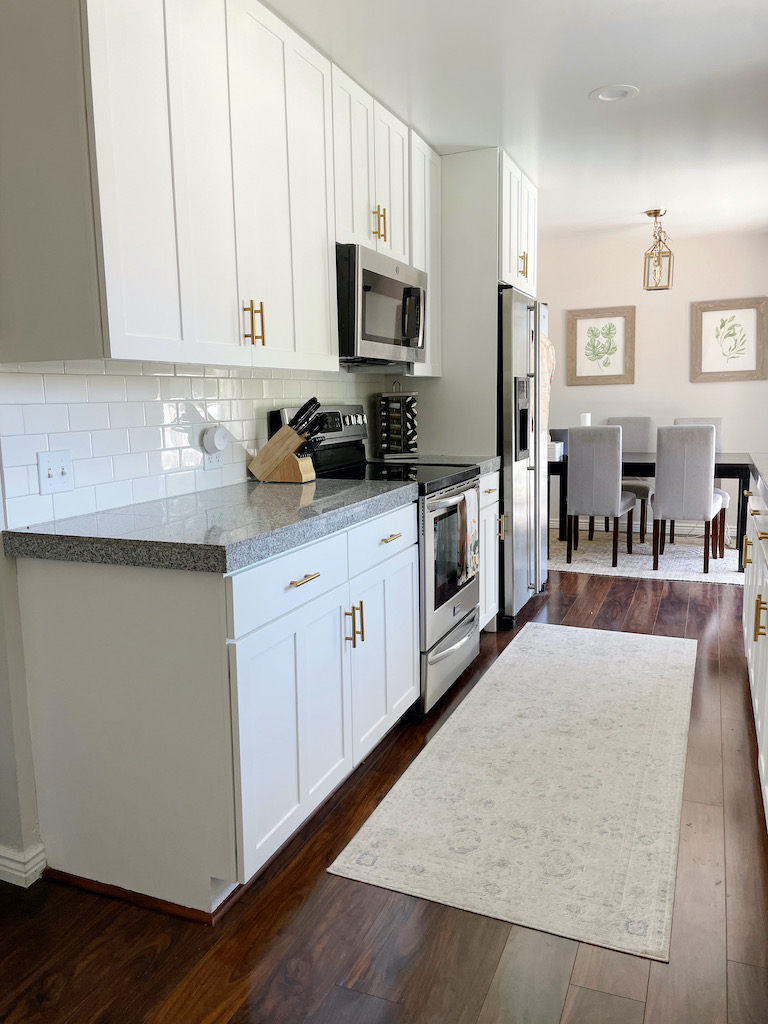
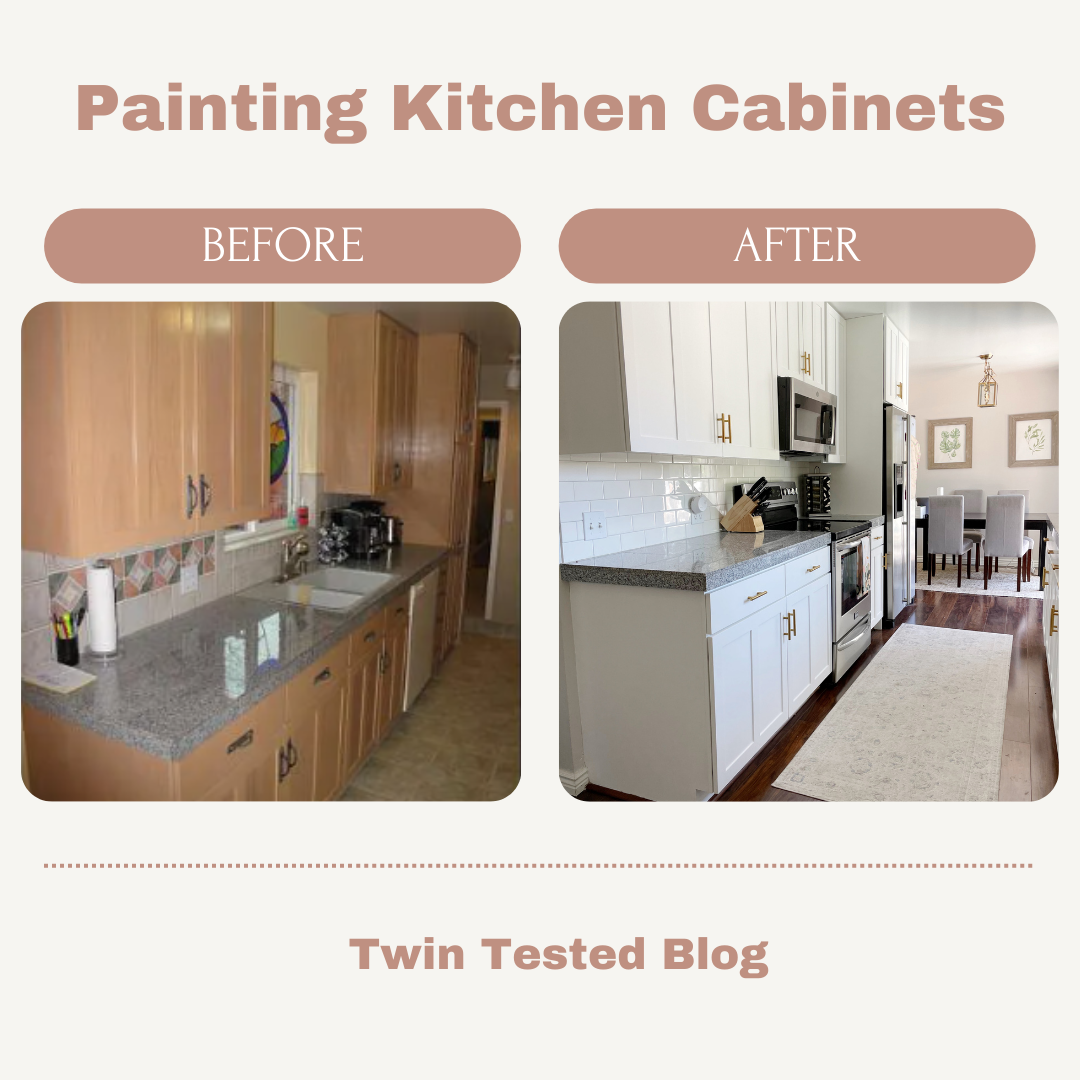
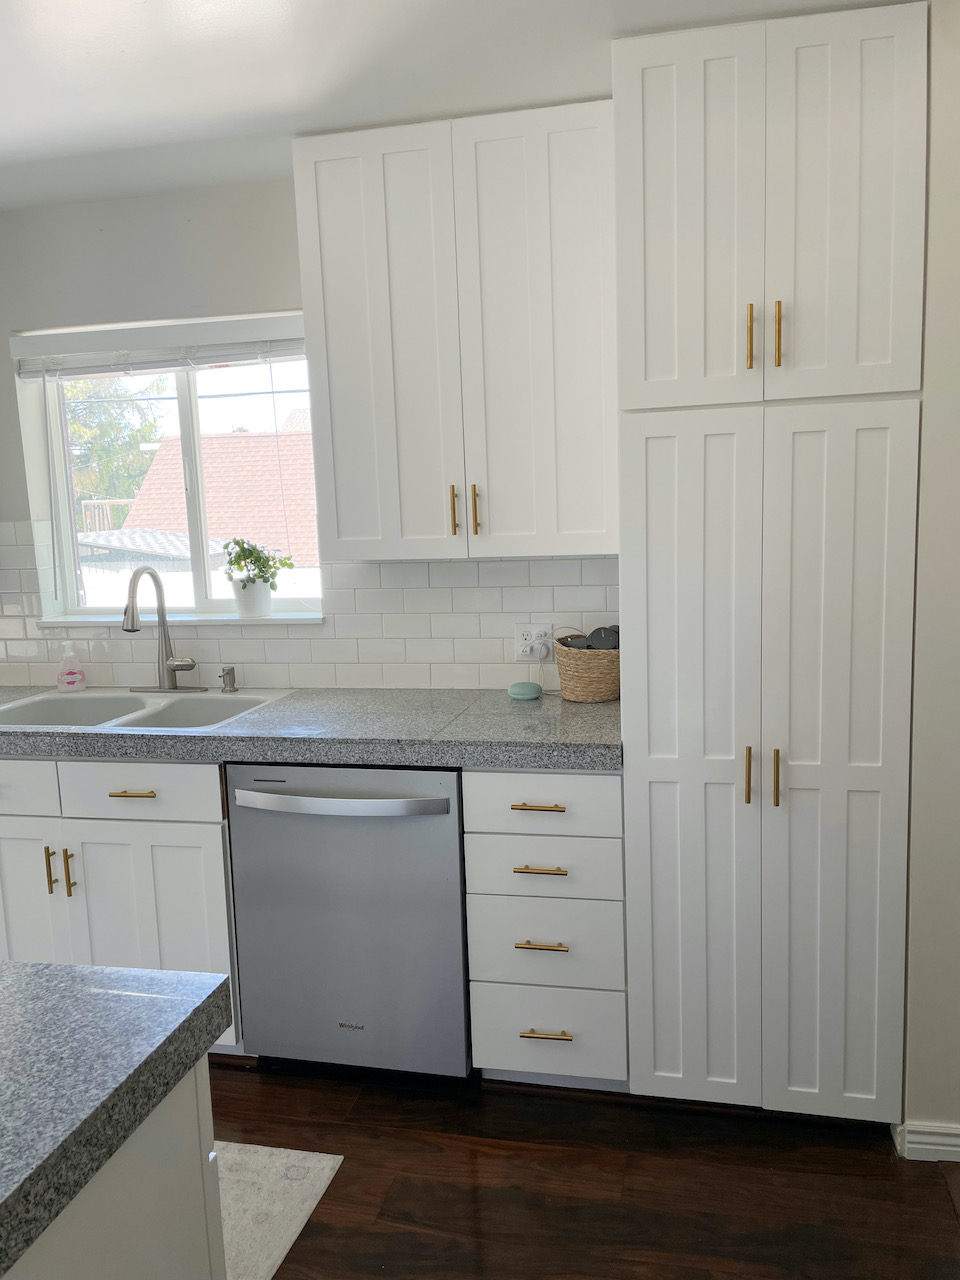
Photo reveal of the finished kitchen

Ta-da! I love how clean it made the kitchen look, I don’t know why we didn’t do it sooner! I bought the rug before the cabinets were done and I think I will move it into our hallway and look for one with a few more colors.

The kids broke them in

On the first night with the new cabinets installed, our 2-year-old smashed open a Ziploc baggie full of smashed raspberries (they were going to be used in homemade ice cream, of course). That was a good reality check! The cabinets are definitely not going to stay looking pristine forever but thank goodness they are wipeable.

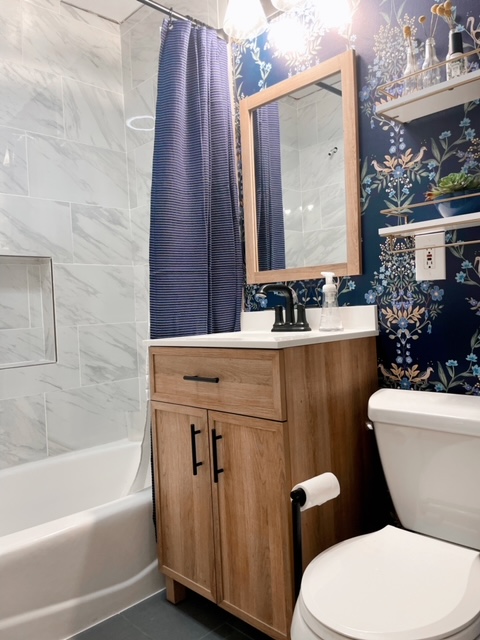
Are you updating a bathroom?

We have been down that road and shared our tips when going through a bathroom renovation. I had my heart set on a moody powder bath and that is what we ended up with. I love it! Check out this blog post for my bathroom tips and how to stay within your budget.

June 25, 2023 Leave a Comment

Our DIY Bathroom Remodel

How to do a bathroom remodel on a budget

*There are affiliate links in this article. Thank you for your support, we hope they are helpful!

We mapped out every product and purchase for our bathroom remodel before we did any demo. In short, the vanity, hardware, mirror, bathtub, tile, wallpaper, and shelves were all chosen before a hammer was taken to any walls. Bathroom remodels are notorious for being expensive so we knew we wanted to do the tile ourselves. By “we”, I mean Parker haha.

How did we save money?

We saved money in a few specific areas like the tile and bathtub because we relied on our skills and got professional estimates and opinions. When a contractor did an estimate for us and encouraged us to do the tile work ourselves if we wanted to save money we took it to heart! If you have been here for a while then you know that Parker has already tiled our fireplace and kitchen backsplash.

What to watch out for when it comes to bathtubs

Going into the remodel we planned to totally replace our old tub. However, that changed once we had a contractor come look at the bathroom. He encouraged us to keep the tub and instead get it refinished in white. I had no idea that removing a cast iron tub can be super expensive because they are so heavy and hard to deal with. By getting our bathtub refinished we spent $600. In comparison, purchasing a brand-new bathtub and getting it installed is about $3,000.

What we splurged on for the bathroom remodel

I love Rifle Paper Co. wallpaper and decided on a navy and white color palette for the bathroom remodel. We decided to buy the peel-and-stick product and it turned out beautifully. Although, I wouldn’t say it is best for your marriage to install wallpaper together in a small space until 1 AM. 😅

We went with marble tile for the shower. This is on the pricier side but white marble is timeless and really completed the look we were going for. Clean, simple, and classic.

Where to look for bathroom products

I was able to find our vanity (similar) at Lowe’s and the toilet at Home Depot (similar), great options if you have a small space. Then we picked out our tile for the shower and floor from Floor & Decor. Lastly, the wallpaper was purchased through Anthropologie.

How long does it take?

Overall, the entire project from start to finish took about 10 months! It is not a small job to take a bathroom down to the studs and then rebuild it piece by piece. Therefore, my number one piece of advice is to be patient. It always takes longer than expected. Be okay with that and have an extra bathroom that you can use in the meantime!

What I would do differently next time

All things considered, I honestly love how it turned out! The navy wallpaper really packs a punch against the white marble and the gray tile on the floor has held up really nicely. Nonetheless, if we do it again I would shift my expectations and prepare for delays. They always happen and it is not the end of the world. My husband was amazing and spent many late nights and weekends working in the bathroom. I guess it’s time to think about our next project!

November 5, 2022 2 Comments

How to plan a safari trip to Africa

Once-in-a-lifetime

For most of us, Africa is a once-in-a-lifetime opportunity. The flights are long, and the safaris are hard to get to, but the payoff is unmatched! While preparing for our trip I had a lot of questions on my mind. What should I pack? What should I expect once I get there? And what is Africa really like? In this post I hope to answer all of those questions and more!

Choosing Your Destination City

We flew into Johannesburg, we knew we were picking up my husband’s mom who had been serving as a missionary for the Church of Jesus Christ of Latter-Day Saints. We were incredibly lucky to be joining someone who had been living in Africa for a year and knew her way around and the nuisances of the city – and how to drive on the opposite side of the road! She put together our itinerary and it was nonstop safaris and adventure. I wish you all could have my mother-in-law in your life, she is the absolute best! When you plan your destination city it will determine the rest of your visit. For example, Johannesburg is a 15-hour drive from Cape Town. Africa is huge and you need to factor in the travel times to the places that you will be going. We ended up spending our time in Johannesburg, Pretoria, Pilanesburg, and Kruger National Park.

What To Pack

Remember, you are traveling to the Southern hemisphere. So while it is summertime in the United States, it is the middle of winter in Africa. This turned out to be perfect timing for us because it meant no bugs and highs around 65 degrees fahrenheit! Another bonus is the animals are active throughout the day because they don’t get too hot from the heat. Knowing that it was their winter helped us prepare by packing a ton of layers. Here is what I would put on your packing list for Africa:

  • Nice Binoculars (we borrowed ours): These are crucial on safari and make it so fun to spot animals from a distance. Even when animals are nearby it is amazing to see their detail up close through the binoculars. Pro tip: You can take pictures and video through binoculars – I dare you to try it! We have some amazing animal photographs because of it.
  • Layers: I wore a hat every single day we were there as well as two jackets, a scarf, and long sleeve shirts.
  • Wool Socks: Just trust me on this, your feet will be so much happier when they are nice and warm. I was so glad that I brought mine.

Where to Stay

My mother-in-law is an incredible traveler and trip planner and I am so grateful for the time she put into every detail of the trip. If you are headed to Africa I would 100% recommend going to Pilanesberg National Park. That is where we started our trip and it is what dreams are made of. We stayed at the Ivory Tree Lodge which is an upscale paradise with some of the most delicious food I have ever had. One of my favorite things they do there is an afternoon tea filled with delicious snacks and the creamiest hot cocoa. My husband and I stayed in our own thatched roof hut complete with luxe robes, a gigantic marble bathtub and gorgeous outdoor shower – we felt like we were on our honeymoon! Think of the huts similar to the ones over the water in Bora Bora but instead in the middle of a national park with elephants, giraffes, and lions mere feet from your door! When you stay at Ivory Tree Lodge the game drives are a complimentary part of your stay and it truly feels like you are driving into Jurassic Park when you descend down the winding driveway and through the electric gate each morning. We saw the “The Big 5” within the first two hours of arriving at the park! The Big 5 is the goal when you are on game drives and is comprised of: elephant, lion, leopard, rhino, and cape buffalo. We saw lions mating (in middle of the road), a mama and baby rhino at a watering hole, a pack of lion sub-adults (what they call teenagers), and so many more incredibly beautiful wild moments. Our guide told us that we were extremely lucky and that some people don’t see all of the big 5 during their entire visits to Africa. Pilanesberg is super beautiful, when you think of African grasslands this is it. It is also easy to access from Johannesburg. I highly recommend it!

Our safari through Kruger National Park

We ended our trip with Kruger National Park, which was a 6 hour drive from Pilanesberg. This is the national park that I had heard of before visiting. It is massive and touches borders multiple countries in Africa. We only had one day in Kruger so we chose to spend it with a guide. That is my other biggest piece of advice: pay for a guide! The OSV’s or (Offroad Safari Vehicles) set you up quite high off the ground so you have a much better view than if you were in your own car. The guides know where the animals are, it is their passion, they will take you to the watering holes and other spots to get the best animal sightings. I talked to a few people who drove their own cars and they did not see half as many animals. Go with a guide, they are so knowledgable and it is so interesting to hear them tell you about the vegetation and how the animals all interact with each other.

Goodbye Africa

I am so grateful for the opportunity I had to visit Africa. A truly magical place that is unlike anything I have ever experienced. If you are wanting to save up for a big trip, start planning your African safari! It was incredible and I am not sure how any other trip in the future will compare.

July 10, 2022 Leave a Comment

Strawberry Brownie Homemade Ice cream

We are back with another crowd-pleasing homemade ice cream favorite! Drumroll please, introducing… strawberry brownie homemade ice cream! Last summer was all about Raspberry Oreo Icecream, thanks to everyone that has tried it and shared the recipe. You have made it one of our most popular posts and we understand why!

The best homemade ice cream maker

If you are new to homemade ice cream may we suggest the Cuisinart Icecream Maker? It is about $100 on Amazon and can make the most delicious ice cream in less than an hour. We have tried a few different brands and this one is our favorite for a few reasons:

  • FAST: It’s super speedy! We grew up with an old-fashioned ice cream maker that took 4-5 hours to make ice cream. It was a time-intensive labor of love. This Cuisinart ice cream maker simplifies the process.
  • NO SALT: You don’t have to buy rock salt (who has that on hand?!)
  • NO ICE: You don’t have to fill it with ice (it can be tedious to continually refill the ice on a hot summer day)
  • SIZE: You get two quarts of ice cream, a lot of the other at-home ice cream machines make one quart, we are usually feeding a crowd for a party or event so the bigger option is better for us. And the best part of making some is saving a bite or two in the freezer for the next day!
  • EASY: It takes minutes to clean and put back in the cupboard

First-timers

For your first batch, may we suggest our chocolate marshmallow recipe? It is super simple to follow but the results will knock your socks off! The super creamy texture of the chocolate is something I crave often. The chocolate marshmallow ice cream does not have any mix-ins so it is a good one to start with so you can see how the texture turns out.

How we decided on strawberry brownie

We settled on the new strawberry brownie recipe after a deep discussion about Ghiradelli brownie mixes from Costco versus the grocery store. (There is a difference, although it is slight) The fudgy texture of the Ghiradelli mix is perfect for this recipe. We love that the brownie mix has chocolate chips sprinkled throughout each brownie.

The big mistake we made

When my new ice cream maker was delivered I was so excited to use it! I put it in the freezer for a few hours and forgot about reading the instructions. When I tried making ice cream that night — it never thickened up! Lesson learned. You have to keep the bowl in the freezer for at least 48 hours before using it. Now we just keep ours in the freezer all the time so that we can have ice cream ready at a moment’s notice.

A few notes before starting

Raspberry was an obvious choice when we were using oreo so we wanted to try something different and went with strawberry. A few notes before you make this recipe:

  • Make sure to puree the strawberries, we diced and then mashed ours and the chunks still felt a little too big once they were frozen.
  • Crumble the ENTIRE brownie pan into the ice cream, we only did half of the pan and regret it. Obviously, the brownie chunks are the best part!
  • It’s all about quality ingredients, we like to get our heavy cream at Costco, with organic berries and Ghiradelli chocolate.
  • Make sure you put your freezer bowl for your ice cream maker in your freezer for AT LEAST 24 hours before making ice cream. This is the only part of the recipe that requires any planning!

Here is the recipe, it should take you less than an hour from start to finish with about 5 minutes of prep!

Yield: 2 quarts

Stawberry Brownie Icecream

strawberry brownie icecream

This icecream recipe has the perfect combo of creamy vanilla, fudgy brownie, and fresh strawberry all in one bite!

Prep Time 5 minutes
Cook Time 40 minutes
Total Time 45 minutes

Ingredients

  • 2 eggs
  • 1 C white sugar
  • 4 teaspoons vanilla
  • 1/2 teaspoon salt
  • 2 C heavy cream
  • 1 C 1% milk
  • 2 C strawberries, pureed
  • 1 pan of Ghiradelli brownies, crumbled

Instructions

  1. Add sugar to beaten eggs and whip until stiff peaks. This takes 5-10 minutes.
  2. Add the remaining ingredients.
  3. Remove from mixer and pour into ice cream maker.
  4. Turn on and mix until it starts to thicken (mine takes 20-25 minutes)
  5. When the ice cream has started to thicken, add the crumbled brownie.
  6. Add in pureed strawberries
  7. Serve immediately and enjoy!

Notes

Do not overbake the brownies, you want to have a fudgy texture!

© admin
Cuisine: dessert / Category: Food

May 15, 2022 Leave a Comment

Silk’n Infinity Laser Hair Removal Honest Review

I am finally giving an update to the Silk’n Infinity Laser Hair Removal product I started using about 9 months ago. It is not recommended for use while pregnant or nursing, so I eagerly waited until I could use it. I have been using it regularly, about every 2-3 weeks. Let’s just get one thing out of the way first – I am a hairy beast. Like, this is the perfect product for me because I have pale skin and thick, dark hair. So, if you are blonde and tan, this may not work. Or, if you have olive or darker skin tones, it may not work. This system of laser technology needs pale skin and dark hair to work effectively.

The Silk’n Infinity‘s eHPL™ technology uses pulses of light to get rid of hair. You can buy one here.

It is EASY

It is so easy to use. I was worried about the learning curve and I shouldn’t have been. It comes with a great little booklet that explains how to use the product. It requires very little set-up, you really just plug it in and turn it on. 

It saves TIME

As someone who has spent thousands of dollars and way too many hours in medical spas getting professional laser hair removal treatments done, this is such a welcome tool! I used to spend 30 minutes driving to a very popular spa and then would be there for about an hour getting my laser treatments. Not only that, but they would apply ultrasound gel everywhere they were going to laser, so I would leave feeling like a goopy mess. As if it isn’t humiliating enough having someone laser your bikini area, let them squirt ice cold gel on it right before. Miserable.

I can do my entire body – armpits, bikini area and legs in less than 10 minutes with the Silk’n Infinity. .

It saves MONEY

I know $400 may seem like a steep price, but if you compare it to the cost of getting professional laser hair removal done, it is a steal. Typical laser treatments cost about $400-$500 per area. That means if you want to get your underarms, bikini and legs, you would be paying well over $1,500. Not only that, but unfortunately it doesn’t last forever. Pregnancy taught me that. All of the hair grew back – and then some. So you do need to do touch-ups and treatments repeatedly through the years. I think it has been such a great investment. You can also share the tool with a sister or friend and pay half the cost. I have let many friends and family members try mine out before they purchase their own. Of course I thoroughly sanitize it after every use.

You look incredibly SILLY using it

My husband now knows if I’m walking around the house with sunglasses on, I’m headed to do some laser hair removal. Ha. But seriously, don’t forget to wear sunglasses! You never want to stare directly at the laser and the sunglasses will protect your eyes. You will for sure feel like an idiot and that’s just part of the fun.

It actually WORKS

I am thrilled to report that it actually works. I have been faithfully using it and have noticed the biggest difference in my underarms and bikini area. My legs are more stubborn (and also tanner) and have not been working as well.

UNDERARMS

I was back to the point of having a permanent shadow – even right after shaving. Now, I can go 3 days without shaving and I never have any visible shadow. The hair in my underarms has thinned dramatically. I think if this product only worked on underarms, I would still buy it. I’ve been so pleased with the progress.

BIKINI AREA

I have held my breath through many bikini and brazilian waxes and I’m happy to report this is a lot less painful. Unlike a wax, it has not gotten rid of all the hair, but it has thinned the hair dramatically.

LEGS

I regularly use self-tanner on my legs, so they are darker than the other areas. I have not noticed a huge improvement, but maybe a slight thinning. I think I may need more time to see better results on my legs.I also think my skin tone on my legs does play a role in it not working quite as effectively.

You can SHAVE

One of the best parts about the product is the fact that you are supposed to use it right after you shave and shower. This makes it such a simple step to add to my routine. You don’t have to apply any gel (thank heavens!) and can easily finish your entire body in 10 minutes. There is nothing worse than wearing long pants in the middle of summer because you haven’t shaved for 3 weeks while waiting to get your legs waxed. Shave and be free! It’s so great.

It doesn’t HURT

It is not painful. If you are interested in buying a laser hair removal tool, chances are you’ve gotten a wax before and this is way less painful than that. If you’ve done professional laser hair removal, you know it can sometimes feel like the snap of a rubber band. Maybe a tiny sting, but nothing more. I think it is less painful than any of the professional treatments I have had. There are also 5 different intensities you can choose from, so you can start slow and ease into it.
I think I’ve covered everything, but if you have questions, please feel free to ask!

May 11, 2022 Leave a Comment

Do’s and Don’ts for family photos (PART II)

Family photo tips

Family photo refresh

It’s time for a family photo refresh! I want to share tips and tricks for looking your best in family pictures with your littles in tow. Our first family photo post from a couple of years ago has been viewed by more than 3 million people so I wanted to give you an updated post now that our family has grown.

Our baby boy!

This time around we have added another member to our family! Winston is our lovable, squishy 1-year-old baby boy. We all know that toddlers are notorious for tricky photo shoots, so I tried to be as prepared as possible. However, on this particular day, we were up against a nap strike and an older sister that fell and scraped her knees twice BEFORE we had even started taking photos. Read on to find out what saved our photoshoot.

Some things that saved the day:

  • A full bag of marshmallows (you may think I am kidding, but we needed the entire thing)
  • A full box of tissues: runny noses, dirt, and tears – be gone!
  • Adult family members to make the kids laugh and smile (grandparents work like a charm)
  • Cousins: my daughter was in heaven playing with her cousins and we got some beautiful, candid photos of them all interacting together

Tips from photographers that I like to follow:

  • DUSK: Take photos at dusk, you just can’t replicate that beautiful glow any other time of day. The way the sky changes makes for a variety of looks in your photos as the sun goes down.
  • MONOCHROMATIC: Don’t be afraid to match your surroundings, I have been very into monochromatic dressing according to the setting I am in. I really liked the fact that we blended into our surroundings instead of having a stark contrast.
  • MOVEMENT: Don’t be afraid to move. Movement adds life to still images and helps personalities shine. My daughter’s favorite thing to do at this age is spin in a dress, so that is what we did for a majority of the shots to get her to smile!
  • THE TOSS: There isn’t a baby on earth that will be able to hold in a smile after being playfully tossed in the air by their parents. This can relax your baby so they think it is more of playtime instead of being trapped.

The most important photo

The main priority for most families is to get the “Christmas card photo” that will be sent out to dozens of your closest family and friends over the holidays. I recommend telling your photographer that is your main priority and knocking it off the list first thing. That way you can be relaxed when you get some other photos of the family. Here are some photos that you need to put on your list:

  • Couple photos. Pictures with just you and your spouse. So many times as parents we put the entire focus on our kids. However, I cherish the photos that my husband and I got together. It gives me warm fuzzy’s when I see what we have accomplished and created together! I printed a photo of just the two of us to frame on my nightstand.
  • Solo baby photo. Babies change so fast, it is so fun to get solo baby shots where you can capture their silly expressions and sweet personality.
  • Mom with kids. I love the photos I got that are one-on-one with my kids. I plan to do this with them until they turn into moody teenagers and refuse to 🙂
  • Dad with kids. Parker and Winston together just melts my heart! Seeing how tiny your baby looks in their dad’s arms is priceless.
  • Grandparents. If grandparents are at the photoshoot it is worth getting a few pictures with them and the grandkids. Parker’s mom is in Africa for the next year so we wanted to get some special pictures with her before she left. The kids love her so much and it shines through in the photos!

What to do with your photos? I have a few ideas:

  • Turn them into a Chatbook. This app is so easy to use and I feel validated in spending hundreds of dollars on a good photographer when I print them in a beautiful book that can double as coffee table decor.
  • Hang them up! My favorite right now is a gallery wall in our hallway. My kids point and talk about the pictures almost every day.
  • Print off your kid’s favorite pictures and find a cute photo stand for their room to display it on. I really love this acrylic one.
  • Use them on your holiday cards! This is the most popular – and for good reason! We all love seeing friendly faces on our walls during the holidays.

What to wear

Now for what to wear in a family photo. It’s hard to find the balance between coordinating but not too matchy-matchy. For this photoshoot, I found my dress first and fell in love with it. It is sold out but this one on Amazon is really similar and affordable. Then I spotted my daughter’s dress (which has since sold out at Old Navy) and thought it would pair really nicely with mine for the photos. My baby’s sweater is an amazingly affordable Amazon find. And I love when my husband wears a button-down to tie the entire look together. This time around I avoided a few things due to the look I was going for:

We did not have any

  • patterns
  • jewel tones
  • jeans
family photos

Poses to avoid

I did not share any “do not” poses from this recent photo shoot. But if you need a refresher check out this post from our last family photo session. And don’t forget about the post that started it all – Britt and Sam show do’s and don’ts for couples that has been seen by millions of people- I know we can’t believe it either! But there are some incredibly helpful tips if you are taking engagement or bridal photos soon! If toddlers are what you are worried about we have a post dedicated to them, How To Get Your Toddler To Smile in Photos

As always thank you for reading and being here. I always love to hear your feedback and ideas from these posts. Be sure to share them below!

November 2, 2021 1 Comment

My Honest Review of the SNOO

The SNOO is all boxed up and ready to be sent on its way – our 6-month rental is over. Taft is officially a SNOO graduate! And truth be told, I had tears in my eyes as we were putting everything away. The SNOO bassinet was a lifesaver over the past 6 months and I’m going to tell you why we loved it.

happy baby

Is it Worth the Cost?

Yes! I know it is expensive. But it is really the only expensive baby gadget that I think is worth the money. The others make big promises and do not pull through. I think the rental option with the SNOO is definitely the way to go. So how much does it really cost?

baby in the snoo

Monthly: $149 per month

6 months Rental: $894

Purchase price: $1,595

When you are sleep-deprived you will literally pay any amount to get some extra sleep. This was an investment that definitely paid off. I know it’s pricey, but one thing I’ve seen friends do is to ask family and friends to put money towards a SNOO in a group gift. That way you get the one thing you really want instead of a bunch of things you don’t really need.

baby sitting in the snoo

The SNOO is Dependable

The SNOO is so dependable. After using it for a few nights, you really get into a great rhythm and have a good idea of what to expect. I love that everything is trackable through the app – which you only have to use if you want to. It tracks the baby’s sleep times, when they woke up and how long it took to calm them. This is so helpful when you wake up and cannot remember exactly how things went the night before. It was also fun to get helpful hints, tips, and tricks through the app.

my honest review of the snoo

The SNOO gives you peace of mind

We all know the importance of keeping your newborn baby sleeping on its back. As new parents, it can be really stressful to create the perfect sleep environment and make sure your baby stays exactly where you put them the whole night. With my first baby, I was always waking in the middle of the night to make sure there wasn’t a blanket over her head or that she had rolled over. With the SNOO, you strap your baby into the 5-second swaddle, which is attached to the bassinet, and you don’t have to worry about them rolling or moving. It gave me such peace of mind I noticed I was no longer waking up sporadically through the night to check on the baby.

It rocks your baby back to sleep

Perhaps the greatest feature of the SNOO is that it truly rocks your baby back to sleep. The technology inside the SNOO senses when the baby stirs or fusses. It slowly increases the motion and white noise to lull them back to sleep. I was so excited to see if it actually worked – and I would say 90% of the time – it did! The other 10% were regular newborn wakings to eat.

my honest review of the snoo. baby sitting in the snoo

It gives parents the gift of sleep

I have not stopped talking about the SNOO since we started using it because I know so many parents who are desperate to get more sleep. This gives you everything you need to get into good sleep habits beginning the first night home with your newborn. I highly recommend getting one. I’m so grateful we did.

A good sleep foundation

Knowing how well my baby slept in the SNOO, I was terrified to transition him out of it. Well, the SNOO knows most parents will be nervous so they give you step-by-step instructions on how to do it. There is even a “weaning mode” on the actual bassinet you can utilize in the weeks leading up to the transition. My baby transitioned great to his crib and I think it’s because the SNOO gave him a good sleep foundation.

I can’t say enough good things! If there is one thing I recommend for a new baby it’s getting a SNOO. You can see my post on Does the Snoo Really Work here. You can see my 4-month SNOO update post here.

October 16, 2021 Leave a Comment

SNOO Update 4 months

SNOO Update

happy baby SNOO update 4 months

Taft is 5 months old!! I cannot believe it. We are still using and loving the Happiest Baby SNOO Bassinet. He had a very rough stretch from 4 – 5 months because he got a cold that lasted 10 days and then RSV, which was so scary.
We have used the SNOO since the night we brought Taft home from the hospital. I had such high hopes. Hearing from several friends that their babies loved the SNOO and slept great in it convinced me to try it. I am so happy to report that it is a miracle bassinet! I cannot believe my baby has been sleeping through the night since he was weeks old. He consistently sleeps for at least an 8-hour stretch from 9 pm – 6 am.

I honestly just thought people were lying about their babies sleeping through the night. I didn’t know it was possible! I remember with my first baby thinking that I would seriously pay $50 for an extra 10 minutes of sleep in the morning because I was so exhausted. Now, there are many mornings where I wake up before the baby refreshed because I got a full night’s sleep.

3 Reasons I Love the SNOO

1. Peace of Mind

The SNOO was created by a pediatrician and is the safest bassinet on the market. That’s because the SNOO 5-second swaddle keeps the baby firmly on their back during the night. It also keeps them centered in the bassinet, so you will never find them with their face pressed against the edge. The SNOO is made of mesh, so it creates a breathable bassinet. The swaddle also has mesh sections so the baby does not overheat. Being a typical mom, I was worried Taft would get cold sleeping without a blanket on, but he never has needed one. They also don’t recommend putting blankets in the SNOO bassinet. Simply dress your baby in pajamas and zip them into the swaddle.

If you’re anything like me, you have a hard time sleeping with a newborn. Add to that swaddle blankets in a bassinet they can roll in and I was up every 20 minutes checking on my first baby. To know your baby is safe and secure the entire night is such a huge deal.

2. It rocks your baby back to sleep for you.

I was curious to see if the SNOO would actually be able to soothe my baby. Shockingly enough, it totally does! The SNOO has sensors inside of it that hear when your baby is unsettled or upset and increases both the rocking motion and the sound machine level until the baby is soothed. It usually takes less than 60 seconds. That means I don’t have to get up in the middle of the night, I can enjoy my sleep! When I put Taft in the SNOO to go to sleep he is usually groggy, but not fully asleep. With the sound machine on and the gentle rocking motion of the SNOO, it puts him right to sleep.

3. It is easy to use

I’m all for technology, but there are only so many gadgets I can handle while taking care of a baby. The Happiest Baby SNOO app is so simple and easy to use. I love that it tracks Taft’s sleep. Have you ever had one of those nights where you thought your baby was up, but then you can’t remember? The SNOO tracks it all for you. You can see how many times they wake up in the night and how long they sleep. I also love that everything is customizable. If you have a preemie, they even have special settings for that.
It’s such a gift for all parents and I am so grateful that we tried it!

The app shows you how much your baby sleeps. The dark blue is sleep, the red is crying/agitated, and the gray means the SNOO is turned off. It’s so helpful to look back and see how the night went.

Just for comparison’s sake, we used the Halo Bassinet with my first baby, and to put it simply – she was over a year old the first time she slept through the night. It has been a night and day difference using the SNOO this time around.

I am absolutely terrified to transition out of the SNOO, which we have to do at 6 months old. I will let you know how it goes.

If you want more information about the Happiest Baby SNOO Smart Bassinet, go here. To see my other SNOO updates and reviews go here.

August 31, 2021 1 Comment

Does the SNOO really work?

Does the SNOO really work? It’s something I wanted to know when I found out I was expecting baby #2. The first thing I started stressing about was sleep. My first child, Hazel was not a great sleeper when she was a baby and it was really challenging. So this time around I wanted to research new products and see if I could try something different.

Does the SNOO really work?

That’s when I started hearing about the Happiest Baby SNOO Smart Sleeper from several friends who swore by it. The SNOO is a baby bassinet that is really so much more. Not only does it come with swaddles, it is super high tech. You download the app to your smartphone and control everything from it. After you secure your baby in the swaddle, you push the “on” button and the sound machine starts, along with the gentle rocking motion. SNOO automatically rocks your baby to sleep and uses soothing white noise to boost sleep.

What’s really fascinating is what happens next. The SNOO senses when your baby is fussy and increases the volume of the sound machine and the rocking motion. It truly is amazing to watch. It’s a bassinet that rocks your baby back to sleep!

For tired parents, it’s like hiring a night nurse. When it’s 3AM and your baby starts getting restless it’s so nice to look over at the SNOO as it gently rocks them back to sleep while you get to stay in bed.

Helps drowsy babies fall asleep

We put Taft in the SNOO when he is drowsy and he goes right to sleep. He is sleeping 4-6 hour stretches every night in the SNOO. I think that’s pretty amazing for an 8-week-old baby.

sleeping baby in the happiest baby SNOO Smart Sleeper

A couple of things to know:

5-second swaddle

SNOO’s easy “5-second-swaddle” is hip safe and never unravels. Protective swaddle wings keep your baby safely on their back.

My 3-year-old daughter can easily do it (supervised). It’s by far the easiest and most effective swaddle I’ve used. SNOO comes with an organic fitted sheet and 3 SNOO Sacks.

happiest baby snoo smart sleeper

You can rent a SNOO

The best news is you can rent the SNOO! If your house is anything like mine, you don’t have one more square inch to devote to storing baby gear. We are renting our SNOO until Taft is 6 months old. That is the age you transition baby to a crib. I think other baby companies should take note because this is a genius idea!

The SNOO is aesthetically pleasing

It’s beautiful. It seems too good to be true- a bassinet that rocks your baby to sleep and it’s pretty too?! The designers really hit it out of the park on this one. I would have still loved it if it was giant and plastic and sparkly because it works! But the fact that it’s pretty? Bravo SNOO!

Created by a pediatrician

The SNOO was created by a very experienced pediatrician. Dr. Harvey Karp is one of America’s most-trusted pediatricians and child development experts. He is also the founder and CEO of Happiest Baby, a smart-tech and parenting solutions company. He is also the author of The Happiest Baby on the Block.

Keeping you in the loop

I will continue to share my experience using the SNOO. So look for those in the coming months. Right now all I can say is I’m so grateful someone created a bassinet that helps my baby sleep! I hope he continues to be a great sleeper.

If you’re in the market for baby products, you can read our recent post on our favorite baby stroller. Find it here.

April 25, 2021 1 Comment

The best stroller for your baby

Have you ever had that moment where your stroller gets jammed and won’t collapse and you have to shove the entire thing into the back of your SUV? No? Just me? Okay cool.

Looking for the right stroller

Now that we have two kids you would think that we would be better at everything in the baby gear world. However, strollers were one of the things that we just kind of accepted whatever came our way.

A hand-me-down jogging stroller from siblings, an upright stroller from grandma, a cheap stroller that comes with the carseat. Our collection was doing the job until a few things happened.

Mistakes happen…

One of us ended up running over the upright stroller while backing out of the garage… whoops. The running stroller has a flat tire and the brake doesn’t work. And the car seat stroller was perpetually jammed and was regularly getting shoved fully upright into the back of the car. Just imagine doing that in every parking garage ever, not embarrassing at all haha.

Finding a brand you trust

I knew it was time to really look at the options and find a quality stroller that we loved. I was familiar with the Colugo brand after ordering their baby carrier for Win. Colugo was started by a (soon-to-be) mom of 4 in NYC after she couldn’t find quality products for her babies that held up over time. They have since expanded into Target and have THE cutest colors and prints.

I ordered my Colugo baby carrier and was blown away by the pretty design and thoughtful design elements. The latches are all magnetic – genius! The carrier fits 7 lbs – 30 lbs without any extra inserts. The entire thing is lined with breathable mesh for those (always) sweaty summer outings. And the cherry on top – it comes with a detachable fanny pack! Hello, best idea ever.

After using the carrier I realized that the Colugo team had also dreamed up a complete stroller system that takes you from infant bassinet to full blown toddlerhood. Not to mention the colors and design were super dreamy.

Colugo Completel stroller in olive

The stroller we decided on

I have the complete stroller system in “Olive” and now I realize what we have been missing out on! This stroller has an incredibly smooth ride, a huge storage compartment (I like to use my stroller when I grocery shop), and has a rain/snow cover for our freezing winter weather here in Utah.

To say we love it is an understatement. Both Parker and I feel very pretty swanky having a stroller that offers such a smooth ride (and hasn’t been run over haha). The stroller folds down in less than 5 seconds. It is super easy to store. I honestly couldn’t love it more. The 5-point harness in the stroller is magnetic which makes getting in and out so much easier!

Where we use our stroller

If you are looking for a new stroller, I highly recommend Colugo. A few of my favorite ways to use the stroller:

  • Grocery shopping: It is so much easier to zoom in with my stroller and grab my favorite Trader Joe’s items without worrying about the car seat being safe – and taking up all the real estate in the cart.
  • Neighborhood walks: When it is nap time for Win it is so nice to have the bassinet option where he can lay flat and comfortably take a nap!
  • Travel: We have an upcoming trip booked to Mexico and I am so excited to take this stroller!

Areas you can save for your baby while on a budget

Right now it is priced right around $400 at Target which is unheard of! Over the years I have realized a stroller is not the place you want to cut the budget on. Along those same lines here are some places where we realized we could cut back with our second baby.

  • Newborn clothes. Crowdfund these! I have an angel best friend in my life that dropped off a bag of THEE cutest newborn clothes that her baby had just grown out of. The knit knotted gowns and caps were so cute and helpful. Before Win, I had been thinking that we had plenty of hand-me-down newborn baby clothes from Lila. Well, once he was here, I realized I had given a bunch of them away and the remainder of our supply was all bright pink!
  • Share baby gadgets and toys. Another friend dropped off her MamaRoo baby swing. Lila did not love her baby swing so I did not buy one for Win. Lucky for me this friend dropped it off and Win ended up loving to take naps in it. It was such a lifesaver to have a safe place to put him down that was in our main living area.
  • Baby swaddles: Another friend dropped off her collection of baby swaddles so I could try them all out and see which one worked best. This was so helpful! I was able to try 5 different swaddles multiple times to find out what my baby liked best. (Turns out the Zippedee Zip star suit is the favorite around here. It makes him look like a baby turtle and I absolutely love it!)

Introducing Britt’s new little one!

If you are in the midst of newborn life. Remember one thing: YOU ARE DOING GREAT! I say this as encouragement for myself just as much as encouragement for you 🙂 We are still dealing with wake-ups at all hours of the night. Good thing these babies are so dang cute!! It is overwhelming at times but things will fall into a new rhythm. Love to all of the mamas, soon-to-be-mamas, and hopeful mother’s-to-be.

Britt holding her new baby

Britt delivered her baby boy and I was able to meet him! They are both happy and healthy which is such a blessing. You forget how tiny and precious newborn babies are. Win looks like a giant next to him!

Brooke holding baby Taft

Britt dealt with a difficult pregnancy so I am so grateful she is doing well with her sweet baby boy. The fact that we by chance had girls first and now have these sweet baby boys is so fun. I am so excited to watch these boys grow up together. We are so lucky to have each other! I am sure she will share more about her new little addition to the family once the newborn fog begins to clear. It seems like a lifetime ago that she introduced Hazel.

I hope you are all doing well during these wild times. I am feeling a renewed sense of energy and purpose this Spring and I am so grateful.

Related Posts Plugin for WordPress, Blogger...

March 7, 2021 Leave a Comment

  • « Previous Page
  • 1
  • 2
  • 3
  • 4
  • …
  • 28
  • Next Page »
Hi! We are identical twins, Brooke & Brittany. We test the latest trends in fashion, beauty, travel and fitness so that you don't have to.

Popular Posts

  • 5 Hacks for Staying on Budget While Building a New Home
  • How to Pick a Home Builder
  • Guide to an Unforgettable Anniversary in Italy

Archives

  • October 2025
  • September 2025
  • April 2025
  • October 2024
  • June 2024
  • January 2024
  • November 2023
  • July 2023
  • June 2023
  • November 2022
  • July 2022
  • May 2022
  • November 2021
  • October 2021
  • August 2021
  • April 2021
  • March 2021
  • January 2021
  • December 2020
  • November 2020
  • October 2020
  • September 2020
  • August 2020
  • July 2020
  • May 2020
  • April 2020
  • March 2020
  • February 2020
  • January 2020
  • December 2019
  • November 2019
  • October 2019
  • September 2019
  • August 2019
  • July 2019
  • June 2019
  • May 2019
  • April 2019
  • March 2019
  • February 2019
  • January 2019
  • December 2018
  • November 2018
  • September 2018
  • July 2018
  • June 2018
  • April 2018
  • March 2018
  • December 2017
  • October 2017
  • September 2017
  • August 2017
  • July 2017
  • June 2017
  • April 2017
  • March 2017
  • January 2017
  • December 2016
  • November 2016
  • October 2016
  • September 2016
  • August 2016
  • July 2016
  • June 2016
  • May 2016
  • March 2016
  • February 2016
  • January 2016
  • November 2015
  • October 2015
  • September 2015
  • August 2015
  • July 2015
  • June 2015
  • May 2015
  • April 2015
  • March 2015
  • February 2015
  • January 2015
  • November 2014
  • October 2014
  • September 2014
  • August 2014
  • July 2014
  • June 2014
  • May 2014
  • March 2014
  • February 2014
  • January 2014
  • December 2013
  • October 2013
  • August 2013
  • June 2013
  • May 2013
  • March 2013
  • February 2013
  • January 2013
  • December 2012
  • October 2012
  • August 2012
  • July 2012
  • June 2012
  • May 2012
  • February 2012
  • December 2011
  • October 2011
  • August 2011
March 2026
M T W T F S S
 1
2345678
9101112131415
16171819202122
23242526272829
3031  
« Oct    

Copyright © 2026 · Twin Tested A Blog By, Brooke & Brittany