Twin Tested

We test the latest beauty, fashion & lifestyle trends so you don't have to!

  • Home
  • About Us
  • Contact Us
  • Twin Tested
    • Do’s and Don’ts for Family Photos
  • Food
    • Recipe for the BEST Banana Pudding of all time!
  • Beauty
    • Makeup must-haves from our group course
  • Life
    • Hazel & Lila are ONE!
  • Privacy Policy
Twin Tested > 2020

Archives for 2020

3 Ingredient Brownies

Ok these 3 ingredient brownies are a lifesaver! Have you ever been in this situation? You’re invited to a party and offer to bring dessert when all of the sudden you realize you have two hours until the party and no time to bake something from scratch? These brownies fool everyone into thinking you took much longer on them than you actually did.

All you need are three ingredients: Ghiradelli Triple Chocolate Brownie Mix, cream cheese frosting, and peppermint chocolate bark. I will swear by the Ghiradelli Triple Chocolate Brownies until the day I die. They are hands down the best box mix brownie out there.

First up, mix up the brownie batter and try to resist eating it all. It’s just as good as the baked brownies in my opinion. I like to buy the bulk pack of multiple mixes they sell at Costco. That way, I always have my favorite brownie mix on hand when the occasion arises that I need to whip up a quick dessert.

Next up, while the brownies are baking, mix up the simplest cream cheese frosting recipe:

1/2 block cream cheese

2 Cups powdered sugar

tray of chocolate brownies with cream cheese frosting

2-4 Tablespoons of heavy whipping cream

I let this whip together for a few minutes until it’s creamy and light and fluffy. Feel free to add more or less heavy whipping cream depending on the consistency you would like. I like mine pretty stiff and thick so it holds its shape on the brownies.

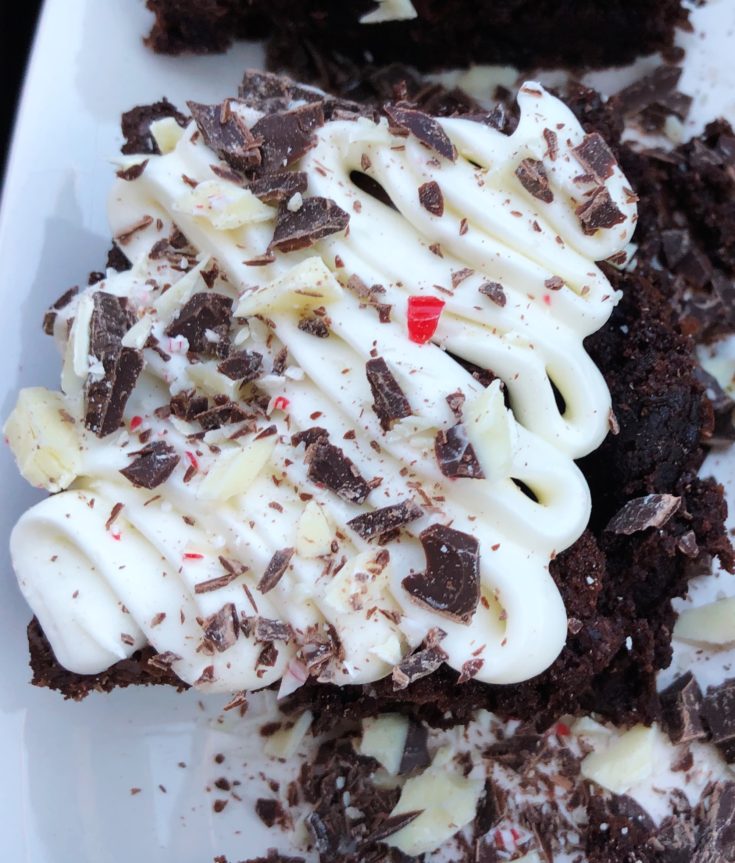
Then, grab a block of peppermint bark and cut it up into very small pieces with a sharp knife. This was much easier than I anticipated because peppermint bark is really crumbly once you dig into it. I used the Trader Joes Peppermint Bark for this recipe. I used less than one square, so it stretches far.

close up of easy holiday brownies

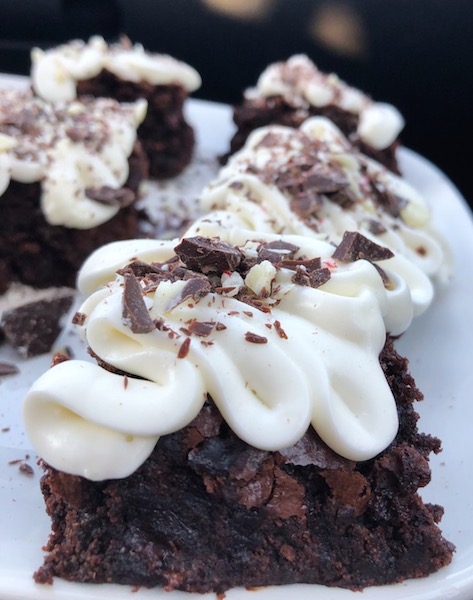
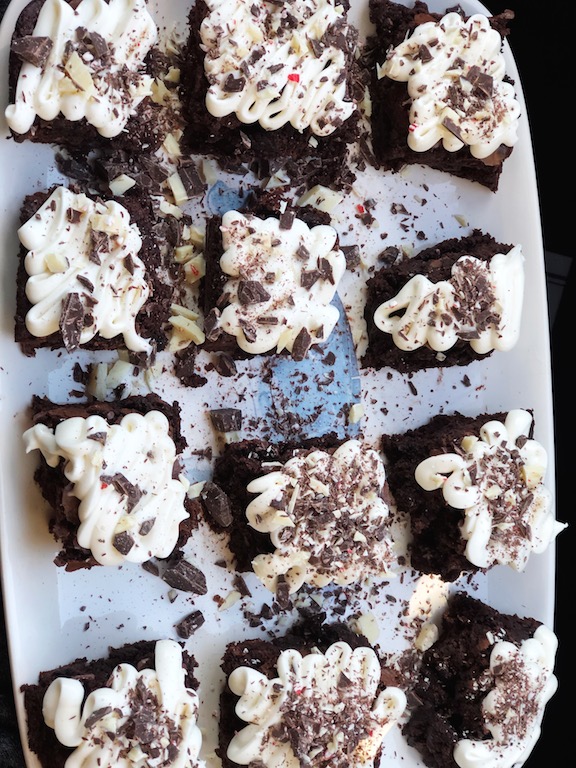
I wait until the brownies are completely cooled and then slice them up and plate them individually before frosting. I find that the frosting looks best this way.

My best frosting tip: if you don’t have piping bags handy, simply put your frosting in a ziploc bag and snip off one corner. Easiest switch ever and works almost exactly the same in my opinion.

I think the combo of peppermint bark on top of the frosting really ups the look of this simple dessert. Another cute and festive idea would be crushed peppermints or candy canes.

Yield: 24 brownies

3 Ingredient Brownies

3 Ingredient Brownies

The easiest last-minute dessert you will ever make! It involves three ingredients and is so simple to put together.

Prep Time 20 minutes
Cook Time 50 minutes
Additional Time 10 minutes
Total Time 1 hour 20 minutes

Ingredients

  • 1 box of Ghiradelli Triple Chocolate Brownie Mix
  • Cream Cheese Frosting
  • 1/2 block cream cheese
  • 2 Cups powdered sugar
  • 2-4 Tablespoons heavy whipping cream
  • 1 large chunk of peppermint bark, chopped fine

Instructions

  1. Mix up the Ghiradelli Triple Chocolate Brownie mix and put in a 9x13 pan to bake at 350 for 50 minutes.
  2. While the brownies are baking, mix together the frosting ingredients: cream cheese, powdered sugar and heavy whipping cream.
  3. Chop up a block of peppermint bark finely.
  4. Wait until the brownies are completely cooled and decorate with cream cheese frosting.
  5. Sprinkle crushed peppermint bark on top of the frosting.
  6. Enjoy!

Notes

If you have another boxed brownie mix on hand, feel free to use it or you can always make homemade brownies.

© admin
Cuisine: dessert / Category: Food

December 21, 2020 Leave a Comment

Do’s and Don’ts gifts for babies

When it comes to baby gifts, there are a TON of products out there. It can be overwhelming to browse the thousands of infant items in a store. I put together this list with products that I have loved and used a million times as well as items that I received and put in the closet and never looked at again.

brooke holding Winston with text that says "Do's and Don'ts for baby gifts"

If you are expecting a baby or know someone expecting a baby it is such an exciting time! From the ultrasound photos to setting up the nursery each step is so fun getting ready for a little one to join the family.

Right now I have a 3-year-old and a 4-month-old. I realize that I am in no way an expert on all things baby. Nonetheless, I want to share what has been useful for both of my kids and what I wish I would’ve saved money on.

Let’s go over some of the don’ts first, these, of course, are my personal opinion. You may love these items – I just didn’t find myself using them.

  1. Wipe Warmer: I could barely get the diaper on in the middle of the night changes let alone remember to warm up the wipes! Yes, this is very considerate of your little one’s bum. Kudos to you if you use one. However, I just tried to change them as fast as possible at nighttime and avoid getting peed on.
  2. Tons of newborn clothing. My first baby was 7 lbs 11 ounces baby and my second was 8 lbs 5 ounces. They both blew through their newborn clothing. We were into 0-3 month clothing after about week 3. Don’t stock up on a million newborn diapers or you may never get through them.
  3. Baby food blender. Just use your grown up blender – they work the same! The baby food blender will just take up space in your kitchen.
Brooke with Colugo carrier

Now let’s move onto the Do’s for baby gifts. These again, are my personal preference, but I have found myself reaching for them again and again.

  1. Boppy breastfeeding pillow: This U-shaped pillow has saved my neck and back this time around! I use the Boppy pillow every time I breastfeed or rock Win to sleep. In a short few months, it will be the perfect safety net to use when teaching Winston how to sit up.
  2. Colugo Baby Carrier: This thing is pure magic for babies! From the mesh lining to the magnetic clips it is design perfection. The best part is you can use this baby carrier for little ones from the time they are 7 lbs up until they are 33 lbs, no infant insert is needed. My baby boy Win loves the forward-facing position so he can see everything going on around him. Colugo has a ton of cute styles to choose from – hello animal print! Colugo was started by a mom in New York City who saw a need in the marketplace and created something amazing! The best part is you can find them at Target!
  3. Freshly Picked moccasins: Baby socks are a headache, they can never quite stay on those adorable, puffy feet. Freshly Picked is not only run by an awesome female entrepreneur (Susan Peterson) but she makes a quality product that lasts. My daughter wore her moccasins nonstop and they still look like new.
brooke wearing winston in the Colugo baby carrier

If you are shopping for a new mama-to-be I highly recommend gifting one of these products. They will be used SO much. Having a baby is a huge transition, so having functional products that help with your baby’s day-to-day activities is incredibly helpful.

Britt is expecting her baby boy in a few short months and I am so excited to share these products with her. It has been so fun to have our babies close together (no we didn’t plan it :)). They have built-in best friends and aunties and cousins that love them!

December 15, 2020 Leave a Comment

Baby Boy Announcement

vintage convertible baby boy announcement

Britt is so excited to share the happy news that she is expecting a baby boy in March! She had so much creating a fun idea for an announcement photo, we wanted to share them here. She came up with the idea pretty quickly and wanted to share the steps she goes through for planning a family photo shoot:

  • Decide the focus of the photo
  • Choose helpful props
  • Choose a location
  • Pick the colors to wear
  • Pick the vibe/season you want to portray

If you’re looking for more help and guidance with photos, we’ve got you covered!

  • Do’s & Don’ts for Couples Photos – Click here
  • Do’s & Don’t for Family Photos – Click here
  • How to Make Toddlers Smile in Photos – Click here
classic car baby boy announcement

Decide on the focus of the photo

Our dad was given a classic convertible for his birthday this past summer by our older brothers. They know he has always wanted one and have been planning the surprise for years. It is the cutest tiny blue car, I knew I wanted to include it in the announcement somehow. It is a fun focal point that evokes what I was going for with this shoot.

baby boy announcement in classic convertible

Choose helpful props

I think props can add a fun and unexpected element to any photo. Yes, I love stand alone family photos, but adding a prop usually makes them more fun. The “Baby” balloon was perfect for this shoot. We wanted to of course make it a baby announcement, but holding an ultrasound did not seem to make a lot of sense for this. It would look too small for the scale of the photo, so the balloon worked perfectly. You can buy the balloon here.

baby boy announcement family photo

How to choose a location

My friend Tori is a fabulous photographer and her parents have a forest-like backyard that I knew would make a perfect location for the photos. Since we were going to be sitting in the car, I knew I wanted a lush green background. That would not have been the case for say, bridal photos. I think I would have picked somewhere more formal. For the purpose behind the photos, I think this woodsy location was exactly what I was looking for.

baby boy announcement family photo with ultrasound

Colors to wear

In picking the colors for our family to wear, I knew I wanted to blend and not stand out from the car too much. I picked an off white flowy dress for myself because it was flattering. I was 17 weeks pregnant when we shot the photos, so I looked more chubby than pregnant. Super cozy baby blue sweater was the winner for my husband Sam because I love that color on him and wanted someone to wear baby blue. And lastly I found a white and blue striped dress for Hazel that seemed to tie it all together. So, I went with blue and white for the colors.

baby boy announcement photo with ultrasound

What announcement vibe are you going for?

Even though we got our baby boy announcement photos taken at the height of Fall foliage color here in Utah, I did not want an autumn look. Personally, I wanted these photos to be warm and airy and bright. A summer vibe fit that much better. That’s one of the main reasons I specifically picked a location with no fall foliage, just beautiful, lush green trees.

Hazel kissing mommy's tummy in baby boy announcement photo
mom and daughter for baby boy announcement photos

Baby Boy Announcement Photos That are Multifunctional

family photo for baby boy announcement

I love that the photos from the photo shoot are multifunctional – I used them for: social media baby announcement, framed family portraits in my house and put one on our Christmas card. Instead of doing three different photo shoots, I did one that covered everything I was looking for.

November 20, 2020 Leave a Comment

How to use Crest Whitestrips Correctly

Some of the links below are affiliate links, meaning, at no additional cost to you I will earn a commission if readers click through and make a purchase.

We have realized over the years after trying dozens of different teeth whitening methods, our absolute favorite is Crest Whitestrips. They do the job so well and are by far the most economical choice. At around $30 a box, you really can’t beat them!

britt holding up crest whitestrips and showing the correct way to use them

Odd methods of teeth whitening that don’t work

  • Banana Peel: Rubbing a banana peel on your teeth will not make them whiter. This myth seemed to be all over the internet a few years ago.
  • Baking Soda or Hydrogen Peroxide: Rubbing plain baking soda on your teeth sounds very gag-worthy. And hydrogen peroxide sounds really dangerous. Just trust the $30 package of Crest Whitestrips.
  • Homemade recipes: Don’t do it. Trust the experts.
  • Brushing your teeth ten times a day: exhausting and no one has time for that.
  • Infomercial products: we spent years hosting a TV show where different whitening products came on the scene and claimed to work magic. NONE of them actually worked.

Complaints about Crest Whitestrips

There are a few complaints and concerns people have about Crest Whitestrips:

  • they slide off your teeth
  • they make your teeth sensitive
  • they don’t cover all of your teeth

The correct way to use Crest Whitestrips

So, here are a few fool proof ways to make sure you are getting the most out of them:

  1. Wipe your teeth dry with a dry index finger.
  2. Carefully apply each strip and push firmly onto your teeth.
  3. Keep them on for 10 minutes past the recommended 30 minutes – it’s like getting extra credit!
  4. Peel them off carefully and wipe teeth clean again with a dry index finger.
  5. If your teeth still feel slimy – brush them without toothpaste – just use a toothbrush and water.
  6. Try not to eat or drink anything dark in color for 30 minutes
putting on Crest whitestrips

I’m worried they will make my teeth sensitive

People with sensitive teeth have a right to be concerned using Crest Whitestrips will make their teeth even more sensitive. Brooke and I both have pretty sensitive teeth and one thing we’ve done that helps is to use Sensodyne toothpaste in the days after using Crest Whitestrips. You can buy it here. It helps to make your teeth not quite as sensitive to hot or cold. Other than that, we have noticed that Crest Whitestrips do not cause any “zinging” unlike some other teeth whitening treatments.

Two different kinds of Crest Whitestrips

There are two different kinds of Crest Whitestrips. The Classic and The Pro. The Classic has strips to last you 14 days that you wear for 30 minutes at a time. The Pro has strips to last you 4 days to wear one hour at a time. We have tried both and each product works great. However, if you want something to work FAST go with the pro. Especially if you are getting ready for a special event.

Best whitening tool on the market

We have truly tried every other whitening item on the market, along with getting professional treatments multiple times. In comparing results, Crest Whitestrips have been the winner again and again. They give you incredible results and are such a great bargain!

Check out our favorite beauty and lifestyle finds

  • Must-have makeup products from our group course
  • Are Amazon leggings really that great?

October 24, 2020 Leave a Comment

No-Bake Peach Pie

Peach season is the best season! So, what makes it even better is putting all of those juicy peaches into a no-bake peach pie. We took a very unofficial family poll yesterday and all of us decided that there is truly no better fruit than a perfectly ripe, juicy peach at the end of summer! Nothing else compares.

What about peach cobbler

We’ve been searching high and low for a no-bake peach pie. Why cook a perfectly fresh and juicy peach? I would much rather eat them raw and prefer the flavor that way. Well, turns out everyone on the internet really just wants peach cobbler. Don’t get me wrong – I think I’ve already made peach cobbler three times this year, but I wanted something a little different.

fresh no-bake peach pie

We made our own peach pie recipe

So, we created our own recipe for no-bake peach pie! Are we professional chefs? Heavens no, but this one is so easy it literally all just came together perfectly. We decided to pull from our most popular recipe on the blog, Copycat Magnolia Bakery Banana Pudding.

The banana pudding recipe is so simple, but it is definitely a crowd favorite and had a couple elements we thought would pair well with fresh peaches. We knew the fresh flavors would make the peach pop.

We used the same base – vanilla pudding and heavy whipping cream. It is so creamy and delicious we knew it would make excellent pie filling.

graham cracker crust

Peach pie crust

One of the wonderful parts of the banana pudding recipe is Nilla wafers. I thought it would be fun to try to make the pie crust with Nilla wafers, but Brooke wanted to try it with graham crackers – so we tried both and guess what? Both are amazing!

In this recipe, we are going to suggest graham crackers, but if you have Nilla wafers, or just love them, feel free to use them. They add the perfect amount of crunchy texture.

As for what to mix in to make the crust, we also tried both coconut oil and butter. It is totally a preference type of thing because they both did a great job getting the blended up graham cracker pieces to come together nicely. So again, if you prefer butter, use it. If you love coconut oil, it works just as well.

Honestly, this crust is so easy (and no bake) there is no need to even think of buying pre-made from the store. Just don’t do it. It won’t have the same yummy consistency as the ground up graham crackers and you will be missing out.

vanilla pudding layer of fresh peach pie

How to get started

First up in this recipe, you are going to make the pudding filling. This part is so simple because you will use instant pudding. The catch here is that you mix in both ice cold water and sweetened condensed milk. I like to make sure my water is truly ice cold by putting crushed ice in the bottom of the measuring cup and then filling with water and letting it barely melt before mixing it in.

You will mix the ice water with the sweetened condensed milk first. This is key to getting a nice pudding consistency. After mixing for about two minutes, add the vanilla instant pudding mix.

I know there are purists out there who will turn their nose up at a pudding mix. I used to be the same! I’ve tried this recipe making a homemade pudding vs. instant and I like the taste of the instant better. Not sure what that says about me, but it’s one of the things that makes this recipe so simple and easy.

You will want to chill the pudding in the mixture for about an hour – it won’t hurt if you want to keep it in there longer, I just usually want to make it quickly.

whipping cream layer of fresh peach pie

Let’s add some whipped cream

Next up, you are going to whip up heavy whipping cream. We have tried lots and lots of brands and our two favorites are the kind you can get at Costco and the Trader Joe’s heavy whipping cream. Both taste denser and creamier than other brands.

After you’ve picked out your heavy whipping cream, pop your metal mixing bowl in the freezer for 5-10 minutes. This will make your cream whip up even faster. It’s a fun trick.

When whipping the cream, we like to wait until it starts to thicken up, then add a bit of powdered sugar and vanilla. Then you can just sit down and eat the entire bowl. Haha oh just me? Ok never mind.

close up of fresh peach pie

Time for peaches

The peaches are the star of the show in this dessert. Make sure you buy the good ones! If you are local to Utah, peach season hits its peak in August and September. We also have an area called Brigham City that is known for growing the most delicious peaches. It’s about an hour drive from Salt Lake and completely worth it during peach season.

We like to wait until they are tender to the touch for this recipe. They need to be more sweet than tart to be at perfect peak peachiness.

How many peaches do you need for this recipe? It completely depends on the size, but I would say add more than you think you need.

finished peach pie with cinnamon sprinkled on top

My rookie mistake

In making this pie for the first time, I decided to try and be artsy and placed sliced peaches in a beautiful design on top of the cream filling and it looked gorgeous. But as I was eating it, I immediately knew the problem – not enough peaches!

You want an almost even ratio of peaches to cream filling in this dessert. That means when it comes to the peaches, pile them as high as you can!

We also tried variations with other fruit mixed in with peaches, like strawberries, blueberries, blackberries, and raspberries. They were all very good and totally work if you run out of peaches.

When are peaches ripe?

We usually just go by touch when feeling peaches for ripeness. If they are somewhat tender when you squeeze, they should be ripe. We also love this guide from Parlee Farms on when you can tell if your peaches are ripe. Did you know if they have a slight yellow color they are ripe and if there is any green on the peach, they need to stay on the tree a bit longer?

Lesson learned

My lesson learned with this no-bake peach pie recipe is that beauty does not matter! It’s what is on the inside that counts. So pour on the peaches and pile them high, then sprinkle with a tiny bit of cinnamon and voila – you will have a new end of summer recipe tradition.

We hope you enjoy it! Let us know if you try it and what you think.

No-Bake Peach Pie

No-Bake Peach Pie

This easy and delicious pie is the perfect way to celebrate peach season! Who doesn't love a delicious pie they don't even have to turn the oven on to make?

Prep Time 1 hour
Total Time 1 hour

Ingredients

  • 1 small pkg vanilla instant pudding
  • 2 C ice cold water
  • 1 can sweetened condensed milk
  • 1 1/2 C heavy whipping cream
  • 1/2 C powdered sugar
  • 1 tsp vanilla
  • 1 pkg graham crackers, blended or crushed finely
  • 4 T butter melted
  • 6 large peaches
  • 1/8 tsp cinnamon

Instructions

  1. Mix the can of sweetened condensed milk with 2 cups of ice water. Blend for two minutes.
  2. Add the instant pudding mix and blend for another minute or until dissolved, I like to use a whisk.
  3. Put the mixture in the fridge for at least 1 hour.
  4. Whip the heavy cream
  5. Before it completely stiffens, add powdered sugar and vanilla.
  6. Whip until stiff peaks
  7. Blend 1 pkg of graham crackers in your blender, food processor, or by hand.
  8. Add melted butter to the graham cracker mixture
  9. Press into pie dish
  10. Peel and slice peaches
  11. Add pudding mixture to pie dish
  12. Add whipped cream to pie dish
  13. Pour sliced peaches on top.
  14. Sprinkle lightly with cinnamon
  15. Enjoy!
© admin
Cuisine: dessert / Category: Food

September 15, 2020 Leave a Comment

How to prepare for a newborn photo shoot at home

Newborn photos are here! Baby Winston had a safe arrival and we could not be happier! Yes, we have had sleepless nights, mastitis, and lots of spit up but the newborn snuggles and sweetness completely make up for it. There is just nothing more precious than a baby fresh from heaven.

Newborn photo shoot with older sibling

This time around, I am so happy to say, my epidural worked and the labor and delivery was such a happy experience! It has also made the recovery process smoother and easier. These metal nipple cups have helped tremendously and I highly recommend them to anyone that is pregnant right now. I have also given myself more grace with this baby and just tried to enjoy the slower pace that comes with a new baby.

Newborn Photo shoot baby swaddled

This entire experience was different due to the global pandemic. No visitors are allowed at the hospital so Lila did not meet her baby brother until we brought him home. In hindsight, I think this was actually a blessing because she was able to meet him in a familiar, comfortable place.

Newborn with older sibling photo shoot

By the second day at the hospital, we definitely missed having visitors (and the delicious food they bring). This time, immediately after my delivery, I was offered 2 Saltines and a cup of juice. Major letdown! I was ready for a huge, juicy burger, fries, and a shake after not being able to eat for 18 hours!

Family picture on the couch with newborn baby
Big sister with new baby brother on the couch for newborn photo session

Getting the baby home was also quite an adventure. We found our air conditioning system was broken and it was a hot 100 degree day. Thanks to some friends with portable AC units and quick working family members we were able to get our house cooled down to a livable temperature while we got a completely new air conditioning system installed throughout our house. I am so happy to say that it has been working without any problems since then!

For Win’s newborn photos I reached out to my incredibly talented friend and photographer Tori Hillyard. She has a great eye for detail and I knew she would be able to photograph my family in a beautiful way. I also felt more comfortable having a friend in my home that I trust during this time when the virus is running rampant.

Father and Son baby photo
Yawning newborn photo

Before the day of the photoshoot, Tori sent me a few tips that would make the shoot go smoother. Along with her suggestions, I remembered a few things from Lila’s newborn shoot that made photos with a baby easier that I want to share in hopes that they can help you too!

  • THERMOSTAT: Turn up the thermostat. Tori sent me a reminder text on the morning of the photoshoot to do this. We knew we wanted some cute shots of the baby wrapped in his diaper wrapped in a blanket and didn’t want to freeze him out while taking them. This worked great and made Win so comfortable that he fell asleep for his “glamour shots”!
  • EAT: Feed your baby and you right before the photoshoot as well as any older siblings. A full belly is a happy belly. I was able to feed the baby right before Tori arrived at my house. When Win got a little fussy during the photos she was nice enough to let me feed him again. A full, sleepy baby is much better for photos than a hungry one! It made a huge difference!
  • BATH: Try to bathe your baby right before the photographer arrives. I did this because Win completely covered himself in pee right as Tori pulled up – of course! However, I was able to give him a quick rinse and it got his dark hair nice and fluffy right before pictures started.
  • LAYOUT OUTFITS: Choose all the outfits, blankets, and props before the photoshoot. Make sure that everything you are going to use is freshly laundered the night before. This will help the flow of the photoshoot.
  • TREATS AND SHOWS: Bribe older siblings! Yes, we did in fact bribe Lila with a donut and a Disney movie. What can I say? We wanted some good shots! It worked for the most part and we got the majority of her photos done at the beginning of the photoshoot so that she could watch her movie quietly as we got the other shots we wanted.
  • DAYTIME: Use natural light. I love the look of light and airy photos, especially when it comes to newborns. Tori captured this perfectly by coming to take the photos in the afternoon when the light was the brightest.
  • SOLO SHOTS: My favorite pictures always tend to be the ones where Parker is one-on-one with the baby. They are so precious and capture how proud he is to be their dad. I highly recommend both mom and dad getting solo shots with the new little one.
  • POSES: The options are truly endless for newborn poses. Tori was great and guided us through a lot of different poses that I had never done before. Ask your photographer for advice and they will be sure to have some great ideas.
Mom and sleeping baby in nursery
Mom and baby in rocking chair

Newborn photo sessions are one of those things that you will never regret doing. The newborn stage is so fleeting that it is so special to capture these little babies when they are so fresh and sweet.

Mom and Dad with new baby boy at home
Close up of baby Win

I know that I will treasure these photos forever. I am already wondering how many prints I can get away with hanging throughout our house because I love them all so much! If any of you mamas are expecting, start planning your newborn photo session with your little one now so that it is not a stressful situation when it comes around. It is a great thing to look forward to with your family and I promise you won’t regret getting them done.

OUTFITS: One of my good friends gave me Win’s gray outfit before he was born and I love it. Highly recommend it, it is from Lou Lou & Company. The knotted gowns are a game-changer for quick diaper changes! Lila’s dress is from H&M’s Spring line.

August 30, 2020 Leave a Comment

What I am packing for baby boy’s delivery

Nine months pregnant

Just two more weeks to go!

We are a couple weeks away from baby boy joining our family! The induction date has been set for July 31st and we could not be more excited! Due to the global pandemic, this pregnancy has gone slow but fast at the same time. I have definitely tried to be extra mindful of my health during pregnancy.

preparing the nursery for baby boy

Expecting baby #2 is very different

Expecting baby #2 is an entirely different experience than #1. We already have most of the baby basics and know what we liked and disliked the first time around. However, I do think that we missed out on a few items as first-time parents that I am excited to have this time around.

This time around I am doing things differently

I want to share a few things that I have gotten in preparation for baby boy. They may seem simple, but it took baby #1 and some lessons to realize how helpful they could be.

Brooke and Lila prepping baby brother's nursery

Hospital outfit for me and baby boy

First up, a hospital outfit for me and the baby. Lila’s labor and delivery was a bit traumatic so I did not get out of a hospital gown the entire stay, let alone touch anything in my hospital bag except my toothbrush. Lila even wore the hospital onesie home, we truly had no idea what we were doing! This time around I have high hopes that the labor and delivery will be a good experience and that I can attempt to unzip my hospital bag before returning home with a brand new baby!

I came across Kindred Bravely and immediately loved their positive and encouraging branding and messaging. I had also heard great things about their products.

Brooke holding up bamboo nursing pads

Soft, roomy robe with matching shorts and nursing bra

The first thing I picked out was a black, extra soft and roomy robe for myself to use at the hospital with matching black shorts (During those first few weeks of breastfeeding a comfortable robe is critical!) Luck would have it that they also carry swaddle blankets and have an adorable black heart print. I plan on using both items at the hospital this time around!

washable bamboo nursing pads

Bamboo nursing pads instead of disposable

Next up, I discovered that they carry soft, bamboo nursing pads that are not only removable but machine washable! I am excited to try something that is not only more economical but kinder to the earth.

The last item I picked out is a nursing friendly sports bra. With Lila I always found it so frustrating to breastfeed while wearing a normal sports bra. This should make that entire situation more doable and convenient.

Brooke holding her favorite diaper bag and changing pad

Diaper bag revamp

Diaper bags can make or break your daily routine. With Lila we had a really nice diaper bag from Nordstrom that had plenty of pockets and storage. However, we quickly realized we would have been much happier with a bag that had backpack straps. We were constantly trying to keep the bag on our shoulders and found it to be really irritating.

Packing my diaper bag

Backpack or bust

I came across Parker Baby Co. and immediately loved their name (same as my husband’s :)) The sleek design and backpack qualities. We picked out a bag that both of us are looking forward to using that not only has backpack straps but plenty of storage and a look that both of us are comfortable wearing.

Dad wearing a gray and cream diaper bag backpack

Here are some suggestions from friends of items to take to the hospital

As for everything else going into my hospital bag, some friends reached out and suggested a few items I had never thought of like:

  • Shethinx period underwear, instead of wearing the bulky mesh undies from the hospital. I am sure they are a million times more comfortable!
  • My own pillow from home, with my own pillowcase on it so that it sticks out from the hospital ones and I don’t forget to take it home with me!
  • Cozy socks like Stance or slipper socks and comfortable shoes like Birkenstocks or flip flops
  • A hairbrush, completely spaced on this one last time haha
  • Snacks, due to the virus we will not be allowed any visitors which means no yummy drop-off’s from friends and family. Friends suggested I pack protein bars, fruit, and other easy to pack snacks. I will definitely be missing the milkshake drop off’s I got after Lila’s delivery!
  • And of course, onesies, swaddle blankets, and beanies for baby boy to wear!

How this experience will be different

So far, it sounds like Parker will definitely be able to be with me for labor and delivery, thank goodness! The doctor says that we will both be asked to wear a mask for the duration of labor. And all expecting moms are currently getting tested for the virus 3 days prior to their delivery date. Although these times are strange and have extra safety measures in place, I am so grateful to feel good and have a healthy baby boy that will soon be making his arrival. Thank you for all of your love and support, it means the world!

July 16, 2020 Leave a Comment

Raspberry Oreo Ice Cream

Raspberry Ice Cream

This is the ice cream recipe you have been waiting for! I did not know I could make ice cream this good at home. This recipe is so simple and easy to put together and everyone will love it! I have always loved raspberry ice cream, but I knew to really take this to the next level, it needed to be Raspberry Oreo Ice Cream! The raspberry flavor, along with the Oreo mix in is so delicious.

My Favorite Ice Cream Maker

I’ve tried several different kinds of ice cream makers and they all yield very different results. I had a cheaper, smaller ice cream maker and I’m going to tell you the truth – the results were disappointing. It never quite froze all the way and you could make only a small amount at a time. Luckily, I have found the greatest ice cream maker ever!

It’s the Cuisinart Frozen Yogurt-Sorbet & Ice Cream Maker. It costs $75 on Amazon and has been the greatest purchase of my year! Not only is it extremely easy to use and clean, but it makes ice cream in 25 minutes. Like perfect, thick, creamy consistency in less than a half-hour. It’s amazing. You can use my affiliate link to purchase here. It’s the #1 Bestseller in Ice Cream makers on Amazon because it truly is the best.

Keys to Ice Cream Success

A couple of notes on how to successfully make this ice cream recipe:

  • It’s all about the ingredients – make sure you buy the highest quality available.
  • Make sure you put your freezer bowl for your ice cream maker in your freezer for AT LEAST 24 hours before making ice cream. This is the only part of the recipe that requires any planning!
  • You can switch up the mix-ins with the raspberry flavor – or simply leave it plain raspberry. Some other favorites include brownie bites and crushed graham crackers.
  • This ice cream can stay in the freezer for a few days! Just put it in an airtight container in the freezer. I really like THESE containers, also from Amazon, for ice cream.

Are You New to Making Ice Cream?

If you’ve never attempted homemade ice cream, it really is easier than you think it will be! We have made this homemade Chocolate Marshmallow recipe for decades in our family if you’re in the mood for something chocolatey.

The fun thing about making homemade ice cream is you can switch up the flavors depending on the season or your mood. This raspberry oreo ice cream recipe is perfect to make in the summertime because you will get the freshest raspberries. I can’t wait to make it in a few more months when we have fresh raspberries in our backyard!

This raspberry oreo ice cream recipe is very adaptable. Let’s say you prefer strawberries to raspberries, feel free to add them instead! Just make sure you also mash them and make them the same smooth consistency so that they will mix in well and not end up frozen solid.

Yield: 2 quarts

Raspberry Oreo Ice Cream

Raspberry Oreo Ice Cream

This recipe lets the flavor of fresh raspberries shine while adding a fun touch with the oreo mix in.

Prep Time 40 minutes
Total Time 40 minutes

Ingredients

  • 2 eggs
  • 1 C white sugar
  • 4 teaspoons vanilla
  • 1/2 teaspoon salt
  • 2 C heavy cream
  • 1 C 1% milk
  • 1 C raspberries, mashed
  • 1 row of Oreo cookies, smashed

Instructions

  1. Add sugar to beaten eggs and whip until stiff peaks. This takes 5-10 minutes.
  2. Add the remaining ingredients, excluding Oreos.
  3. Remove from mixer and pour into ice cream maker.
  4. Turn on and mix until it starts to thicken (mine takes 20-25 minutes)
  5. When the ice cream has started to thicken, add the crushed Oreos.
  6. Let all flavors combine for a minute or two.
  7. Serve immediately.

Notes

Make sure you put your ice cream freezer bowl in the freezer for a full 24 hours before making this recipe. It makes a huge difference in getting the right consistency.

© admin
Cuisine: dessert / Category: Food

May 12, 2020 Leave a Comment

7 Books we are Loving Right Now

2020 has been a good one when it comes to reading! We’ve read a lot this year and want to share 7 books we are loving right now. One thing we have loved about always having a book or kindle handy is that we have been able to spend less time on social media and feel like our brains are growing and developing instead! We’ve rounded up our favorite reads from the past few months and they come from lots of different genres. So whatever your mood, there’s probably something for you!

The Moment of Lift by Melinda Gates

How Empowering Women Changes the World

Written by Melinda Gates, this book is filled with her memories working with women around the world. Her experiences center around working on global public health initiatives with the Gates Foundation. I was impressed with not only Melinda as a human being trying to give back, but how truly impressive and expansive her efforts are. The book brought tears to my eyes many times as I struggled to read about the horrors and sadness many women have to deal with. In the end, it inspired me to support and champion women however I can.

You can buy it on Amazon here.

The Rosie Project by Graeme Simsion

I just loved this book. The premise is different than most romantic comedies given the fact that the main character has Asperger’s. Instead of being critical of that, the book uses that characteristic to bring humor to many situations. I found myself laughing out loud many times. I also loved the sequel to this book, The Rosie Effect.

You can buy the book on Amazon here.

The Girl with Seven Names: Escape from North Korea by Hyeonseo Lee

This book is riveting from the very first chapter. I could not believe the things I was reading. It is rare to read a factual account of life in North Korea and I found it absolutely fascinating. I could not believe the author’s personal courage and bravery. The fact that she has shared so much of her life and experiences felt really special to read. I recommend this book to absolutely everyone.

You can buy the book on Amazon here.

Such a Fun Age by Kiley Reid

This book touches on serious social issues but does it in a way that makes you want to keep turning the pages. I feel like I will give away the plot if I say too much, so I will just say that it is highly entertaining and a definite page-turner. If you’ve ever worked as a nanny, you should read it!

You can buy the book on Amazon here.

American Kingpin: The Epic Hunt for the Criminal Mastermind Behind the Silk Road by Nick Bilton

This book is written by a journalist and you can tell – which is probably why I loved it so much. This story is unbelievable from beginning to end. American Kingpin is about the creation of the Silk Road on the Dark Web. It reads like a long-form article and I really enjoyed it. Vanity Fair correspondent and New York Times bestselling author Nick Bilton keeps you hanging on his every word. The bonus to this one is that I felt like I learned a lot about a true story and events.

You can buy the book on Amazon here.

Maybe You Should Talk to Someone by Lori Gottlieb

This is a fun one because it’s written differently than anything I’ve ever read before. Written by Gottlieb, who is an actual therapist, she shares memorable patient stories, while intertwining her own life story throughout the book. It never felt preachy or like I was reading self-help. The book is extremely well written and it felt like she kept a fast pace throughout, so I never wanted to put it down. I finished it in three days – which is fast for me!

You can buy the book on Amazon here.

Open Book by Jessica Simpson

If you are looking for a 400 page People magazine, this is it! I need to disclose that I am a Jessica Simpson fan and I loved reading it for a lot of the nostalgic moments she talks about. I was amazed at how open the former popstar is in sharing her real-life experiences, mistakes, and relationships. Overall, I think if you enjoy reading memoirs you will enjoy this one.

You can buy the book on Amazon here.

We want to hear from you!

There you have it! The 7 books we are loving right now. We would love it if you shared your favorite books you are loving right now. 2020 seems to be the year of reading for us, so we need some new recommendations. Books are magic and we love sharing our favorite reads with you.

April 30, 2020 Leave a Comment

Pregnancy tips and tricks

Pregnancy tips and tricks from 25 weeks into my second pregnancy

Now that I am nearing the end of my second trimester of this pregnancy with this baby boy I have learned some tips and tricks that are keeping me sane that I want to share. I realize that everyone’s pregnancies are different, this is just the pregnancy advice that is working for me! This pregnancy has been much more relaxed than my last one, and I am grateful for the hindsight I have come to realize on a few things. If you know a pregnant or expecting mama I am sure they would appreciate a few of the items on this list! (hint hint, don’t miss the homemade chocolate ice cream recipe!)

How to exercise when you are pregnant

First up, listen to your body when it comes to exercising. This time around I am much more aware of exercises that could be harmful versus helpful. I also want to do things that make me feel good. Some of the best workouts are on my treadmill. I have found that you can do simple exercises with 5 lb. weights (or water bottles or soup cans, etc…) on an incline treadmill at slow speeds that do not include any running but still offer a great workout when pregnant! I created a little video to show you some of my favorite basics:

  • Lunges at an incline with a slower belt speed
  • Squat step-outs at an incline with a slower belt speed
  • Bicep curls to an overhead press at an incline with a slower belt speed.

Find a new favorite show to help motivate you to move

I recommend finding a TV show that you want to binge and making it a rule for yourself that you can only watch it while you are on the treadmill! This has helped my motivation immensely. A few shows I am loving right now are: All American (pretty much a mix of The OC and Friday Night Lights), Songland (songwriter Ryan Tedder is a genius!), and This is Us (a classic).

My favorite pregnancy fashion

My baby bump is getting bigger by the day and comfort is of utmost importance to me right now. At the beginning of this pregnancy, I made a commitment to myself to find as many flowy maxi dresses as possible! When I was pregnant with Lila I came across a shop called Pink Blush Maternity. The dresses and blouses that I ordered from there not only fit great but were also really high quality and looked the same after being washed countless times.

I was thrilled to find this maxi dress and this flowy top. They are currently on repeat in my wardrobe. If you are expecting a little one I highly recommend checking them out and treating yourself to something cute! And let’s be honest, the maxi will be perfect for covering my swollen ankles in a month or two!!

The best lotions and potions for your bump

As this baby boy continues to grow by the day – I have tried to stay on top of hydration. Both with drinking enough water and what I am putting on my skin. During my first pregnancy, I tried every belly oil, cream, and lotion that promised to keep stretch marks at bay. And while I was lucky to come away without any the first time I was not overly impressed with any specific product.

This time I have come to find a product that I LOVE and use every day and that actually hydrates and keeps your belly from ever feeling itchy. It is called Vanicream and I was introduced to it by my sister-in-law who used it to treat her kids’ dry skin and eczema. It is free of all dyes, fragrances, and parabens and ideal for sensitive skin. I slather it on me and Lila every single day! It is so great for little ones who have sensitive skin, I plan on using it on baby boy once he is here. This Vanicream Light Lotion with Pump is more convenient to use versus the tub of Vanicream. Try it and I bet you will be sold!

pregnancy tips and tricks at 25 weeks along with baby boy

My number one pregnancy craving is…

And now for the cravings, my number one pregnancy craving lately is ice cream. During this time of isolation, I have found immense satisfaction from this specific recipe for freshly churned homemade ice cream! My mom has an old-fashioned ice cream maker from 1975 that makes the hands-down best ice cream on the planet! It is so creamy and delicious and makes over a gallon so I can choose to share with neighbors or keep some extra in my freezer for desperate times!

Homemade Chocolate ice cream recipe
my number one pregnancy craving and how i am dealing with it

This family chocolate marshmallow ice cream recipe has a no-fail guarantee and always turns out SUPER creamy. If you choose to make it, you will not be disappointed. The toppings and flavors can be changed up and you can add whatever you like. For example, we have made raspberry oreo and fresh peach all from this same recipe. To top it off, splurge on some waffle cones and your family will be thrilled! Or you can kick things up a notch and make Britt’s divine Half the Fat Monster Cookies to go along with your ice cream for the perfect pairing!

Grateful to be more than halfway and healthy

In all honesty, I am so grateful that I can be healthy and lucky enough to be carrying another child. Pregnancy is a long road but so far I have felt pretty good. To all you other expecting mamas out there – you can do it! And to anyone that is hoping for or going through difficult times starting or adding to their family, I am thinking of you.

Tell me what keeps you happy during pregnancy

Here is to 14 more weeks until we meet this little one! I will share baby items that I have gathered for this little one over the next little while. In the meantime, I would love to hear what your tried and true baby must-haves are and add them to my list. I hope that you are all staying safe and healthy during this time of uncertainty.

Related Posts Plugin for WordPress, Blogger...

April 24, 2020 1 Comment

  • 1
  • 2
  • 3
  • Next Page »
Hi! We are identical twins, Brooke & Brittany. We test the latest trends in fashion, beauty, travel and fitness so that you don't have to.

Popular Posts

  • 5 Hacks for Staying on Budget While Building a New Home
  • How to Pick a Home Builder
  • Guide to an Unforgettable Anniversary in Italy

Archives

  • October 2025
  • September 2025
  • April 2025
  • October 2024
  • June 2024
  • January 2024
  • November 2023
  • July 2023
  • June 2023
  • November 2022
  • July 2022
  • May 2022
  • November 2021
  • October 2021
  • August 2021
  • April 2021
  • March 2021
  • January 2021
  • December 2020
  • November 2020
  • October 2020
  • September 2020
  • August 2020
  • July 2020
  • May 2020
  • April 2020
  • March 2020
  • February 2020
  • January 2020
  • December 2019
  • November 2019
  • October 2019
  • September 2019
  • August 2019
  • July 2019
  • June 2019
  • May 2019
  • April 2019
  • March 2019
  • February 2019
  • January 2019
  • December 2018
  • November 2018
  • September 2018
  • July 2018
  • June 2018
  • April 2018
  • March 2018
  • December 2017
  • October 2017
  • September 2017
  • August 2017
  • July 2017
  • June 2017
  • April 2017
  • March 2017
  • January 2017
  • December 2016
  • November 2016
  • October 2016
  • September 2016
  • August 2016
  • July 2016
  • June 2016
  • May 2016
  • March 2016
  • February 2016
  • January 2016
  • November 2015
  • October 2015
  • September 2015
  • August 2015
  • July 2015
  • June 2015
  • May 2015
  • April 2015
  • March 2015
  • February 2015
  • January 2015
  • November 2014
  • October 2014
  • September 2014
  • August 2014
  • July 2014
  • June 2014
  • May 2014
  • March 2014
  • February 2014
  • January 2014
  • December 2013
  • October 2013
  • August 2013
  • June 2013
  • May 2013
  • March 2013
  • February 2013
  • January 2013
  • December 2012
  • October 2012
  • August 2012
  • July 2012
  • June 2012
  • May 2012
  • February 2012
  • December 2011
  • October 2011
  • August 2011
March 2026
M T W T F S S
 1
2345678
9101112131415
16171819202122
23242526272829
3031  
« Oct    

Copyright © 2026 · Twin Tested A Blog By, Brooke & Brittany